GPG 與 YubiKey 的相遇之旅
PGP, OpenPGP and GPG - What’s The Difference
Pretty Good Privacy - PGP 是 Philip R. Zimmermann 在 1991 年創造的對稱式加密法,其目的正是為了能夠在 BBS 上安全的儲存訊息以及檔案所創造的
之後在 1997 年,IETF 為此制定了一系列的標準 - RFC 4880
有了這個標準之後,各種不同的實作相繼推出,其中最為人知的是 GnuPG - GPG
What Can GPG Do?
GPG 除了可以加密訊息以及檔案之外 最重要的肯定是認證了
在這篇文章 How I got Linus Torvalds in my contributors on GitHub 中
作者演示了如何造假 commit log

其實原理很簡單,GitHub 是使用 email 來辨識該筆 commit 的
所以你只要知道 target user 的 email 就可以進行偽造了 亦即
$ git -c user.name='Linus Torvalds' \
    -c user.email='torvalds@linux-foundation.org' \
    commit -m "Fake commit"
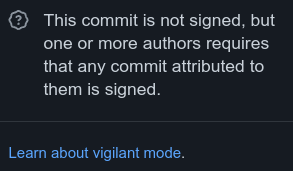
所以為了能夠證明該筆 commit 真的是你自己提交的,你可以使用 GPG 等其他工具來驗證
有經過認證的,在 commit 旁會看到 Verified 字樣
Unverified 必須要手動開啟顯示才有

When will I Need GPG key
如果說 Git commit with GPG key 是個人要求所使用的
那有沒有在特定情況下必須要使用的呢?
事實上我曾經遇過必需要使用 GPG key 的情況
當時我在 Nvidia Jetson Nano 上面使用 Intel AX200 wifi 遇到了點問題
為了要將 log 那些等等的交給 kernel developers debug
他們要求我將以上資訊通通使用他們的 GPG public key 進行加密
這也算是我第一次實際使用 GPG key 的情境
除了與 kernel developers 在 email 上的對話之外,我也有將此情況 report 到 bugzilla.kernel.org
在這裡也順便紀錄一下 iwlwifi: AX200: Wifi not working on Nvidia Jetson Nano
YubiKey
YubiKey 是 Yubico 公司生產的安全金鑰產品
透過實體金鑰,你不必在記一大堆密碼,即可進行身份認證
身份認證? 沒錯,你也可以將 GPG 寫入 YubiKey 進行身份認證
又或者是你跟我一樣,需要在多台機器上進行開發作業,又不想在你的 GitHub 上加了好幾把 key
本文使用的 YubiKey 版本為 YubiKey 5 NFC
Before Setup
在你參考 Yubikey 官方教學文寫入 GPG key 之前先等等
有一個很重要的東西必須先做
KDF - Key Derived Function 功能
預設的情況下是關閉的,而 YubiKey 在 KDF 功能關閉的情況下會使 PIN 碼以 明文(plaintext) 的方式儲存
然後官網教學完全沒寫 笑死(我全部做完之後繼續爬文改設定看到這一項做不了才在 issue 上面發現, 可參考 Mention Key Derived Format)
首先 插入 YubiKey(必須是完全沒動過得前提下才可以,如果有動過,那就參考 Resetting the OpenPGP Application on the YubiKey 囉)
$ gpg --card-edit
gpg/card> admin
Admin commends are allowed

gpg/card> kdf-setup

// Admin PIN 預設是: `12345678`
// PIN 預設是: `123456`

gpg/card> quit
做完以上,可以透過以下指令檢查
$ gpg --card-status
你應該要看到其中一行是這樣的(如果看到 off 表示失敗)
KDF setting ......: on
Generate GPG Key
一般來說,GPG key 可以有兩種生成方式
- 直接在 YubiKey 上面 generate
- 在 offline 作業系統上 generate
YubiKey 官方是推薦 offline 生成,避免之後 private key 遺失就沒救了
首先,插入 YubiKey, 並開啟 command line 輸入以下
$ gpg --expert --full-gen-key

Please select what kind of key you want:
   (1) RSA and RSA (default)
   (2) DSA and Elgamal
   (3) DSA (sign only)
   (4) RSA (sign only)
   (7) DSA (set your own capabilities)
   (8) RSA (set your own capabilities)
   (9) ECC and ECC
  (10) ECC (sign only)
  (11) ECC (set your own capabilities)
  (13) Existing key
  (14) Existing key from card
Your selection?

# 輸入: 8

Possible actions for a RSA key: Sign Certify Encrypt Authenticate
Current allowed actions: Sign Certify Encrypt

   (S) Toggle the sign capability
   (E) Toggle the encrypt capability
   (A) Toggle the authenticate capability
   (Q) Finished

Your selection?

# 輸入: E
# Note: 請務必確認經過上述指令後 Current allowed actions: 這行
# Note: 只有顯示 Sign Certify 而已
# 輸入: Q

RSA keys may be between 1024 and 4096 bits long.
What keysize do you want? (3072)

# 輸入: 4096

Please specify how long the key should be valid.
         0 = key does not expire
      <n>  = key expires in n days
      <n>w = key expires in n weeks
      <n>m = key expires in n months
      <n>y = key expires in n years
Key is valid for? (0)

# 輸入: 0
# Note: 或者是你想要設定 expire time 也可以

# 接著輸入你的個人資訊 完成之後會長這樣
You selected this USER-ID:
    "Shawn Hsu (COMMENT) <TEST@TEST.COM>"

Change (N)ame, (C)omment, (E)mail or (O)kay/(Q)uit?

# 完成輸入之後,必須輸入 passphrase(用於 GPG 驗證)
# 接著等它跑完就可以了

gpg: key xxxxx marked as ultimately trusted
gpg: revocation certificate stored as '/home/ambersun/.gnupg/openpgp-revocs.d/xxxxxxxxxxxxxxxxxxxxxxxxxxxxxxxxxxxxxxxxxxxxxxx.rev'
public and secret key created and signed.

Note that this key cannot be used for encryption.  You may want to use
the command "--edit-key" to generate a subkey for this purpose.
pub   rsa4096 2022-03-11 [SC]
      xxxxxxxxxxxxxxxxxxxxxxxxxxxxxxxxxxxxxxxxxxxxxxx
uid                      Shawn Hsu (COMMENT) <TEST@TEST.COM>
$
Generate GPG Subkey
primary key generate 完成之後,接下來要將 subkey 一起 generate(目的是為了使用其他 GPG 的功能)
Add Encryption Key
一樣,插入 YubiKey, 並開啟 command line 輸入以下
$ gpg --expert --edit-key xxxxx
# 其中 xxxxx 為 GPG key id

gpg> addkey

Please select what kind of key you want:
   (3) DSA (sign only)
   (4) RSA (sign only)
   (5) Elgamal (encrypt only)
   (6) RSA (encrypt only)
   (7) DSA (set your own capabilities)
   (8) RSA (set your own capabilities)
  (10) ECC (sign only)
  (11) ECC (set your own capabilities)
  (12) ECC (encrypt only)
  (13) Existing key
  (14) Existing key from card
Your selection?

# 輸入: 8

Possible actions for a RSA key: Sign Encrypt Authenticate
Current allowed actions: Sign Encrypt

   (S) Toggle the sign capability
   (E) Toggle the encrypt capability
   (A) Toggle the authenticate capability
   (Q) Finished

Your selection?

# 輸入: S
# Note: 請務必確認經過上述指令後 Current allowed actions: 這行
# Note: 只有顯示 Encrypt 而已
# 輸入: Q

RSA keys may be between 1024 and 4096 bits long.
What keysize do you want? (3072)

# 輸入: 4096

Please specify how long the key should be valid.
         0 = key does not expire
      <n>  = key expires in n days
      <n>w = key expires in n weeks
      <n>m = key expires in n months
      <n>y = key expires in n years
Key is valid for? (0)

# 輸入: 0
# Note: 或者是你想要設定 expire time 也可以

# 接下來都確認就可以了
Add Authentication Key
其實步驟都跟 Add Encryption Key 一樣
主要的差異是在
Possible actions for a RSA key: Sign Encrypt Authenticate
Current allowed actions: Sign Encrypt

   (S) Toggle the sign capability
   (E) Toggle the encrypt capability
   (A) Toggle the authenticate capability
   (Q) Finished

Your selection?

# 輸入: S
# 輸入: E
# 輸入: A
# Note: 請務必確認經過上述指令後 Current allowed actions: 這行
# Note: 只有顯示 Authenticate 而已
# 輸入: Q
全部都做完之後 你的畫面上應該會顯示如下圖
sec  rsa4096/xxxxxxxxxxxxxxxx
     created: 2022-03-11  expires: never       usage: SC
     trust: ultimate      validity: ultimate
ssb  rsa4096/yyyyyyyyyyyyyyyy
     created: 2022-03-11  expires: never       usage: E
ssb  rsa4096/zzzzzzzzzzzzzzzz
     created: 2022-03-11  expires: never       usage: A
[ultimate] (1). Shawn Hsu (COMMENT) <TEST@TEST.COM>
或者是你可以跑 $ gpg --list-keys
pub   rsa4096 2022-03-11 [SC]
      xxxxxxxxxxxxxxxxxxxxxxxxxxxxxxxxxxxxxxxxxxxxx
uid           [ultimate] Shawn Hsu (COMMENT) <TEST@TEST.COM>
sub   rsa4096 2022-03-11 [E]
sub   rsa4096 2022-03-11 [A]
上述列出了現在電腦上的 GPG key 資訊,其中 usage: SC 這部份是什麼意思呢?
根據 trying to understand UID and subkeys 提到
(S)ign: sign some data (like a file)
(C)ertify: sign a key (this is called certification)
(A)uthenticate: authenticate yourself to a computer (for example, logging in)
(E)ncrypt: encrypt data
- (S)ign
- 很好理解,對檔案簽名,證明該檔案是來自可信任的來源
- (C)ertify
- 對 key 進行簽名認證
- 假設你有多把的 subkey, 那麼怎麼樣才能證明該 subkey 是屬於某個人的呢? 因此 certify 就是為了驗證 subkey
- (A)uthenticate
- 其實 GPG key 還可以配合 ssh 使用,詳見 GPG as SSH Key
- ref: What is a GPG with “authenticate” capability used for?
- (E)ncrypt
- GPG key 可以針對訊息進行加解密
- 概念上是: 假設 A 要傳訊息給 B
- A 必須使用
B 的 public key對訊息進行 加密 - A 也可以同時使用
A 的 private key對訊息簽名 - B 收到訊息之後需要用
B 的 private key對訊息進行 解密 - B 為了驗證訊息是否來自 A, 它需要使用
A 的 public key對簽名進行驗證
- A 必須使用
Backup Your GPG Key
為了避免你後續出問題,YubiKey 的設計是一旦金鑰寫入就無法拿出來(同時它會把系統上的金鑰也一併刪除)
所以在此非常建議你對金鑰進行備份作業
而步驟就相對簡單了
$ gpg --export --armor xxxxxxxxxx
$ gpg --export-secret-keys --armor xxxxxxxxxx
$ gpg --export-secret-subkeys --armor xxxxxxxxxx
分別將以上三個 key 輸出儲存起來(e.g. 寫在紙上,或存在 usb 隨身碟裡面皆可)
How to Restore your GPG key to Yubikey
你有可能會因為各種情況而導致你必須重設你的金鑰
而這個步驟會重設你的 Yubikey, 這時候你就必須要 restore 你的資料回去了
相比於其他的資料,你的 GPG key 私鑰肯定是最重要的東西了
因為他的唯一資料是存在於你的 Yubikey 之中(如果你沒備份的話)
接下來就要教你,如何回復你的 GPG key
一開始最重要的事情當然是確認你有做好備份並且檔案健全(可參考Backup Your GPG Key)
如果連這個步驟都沒有做那就不用玩了(你可以重新開始了)
第一步驟當然是將備份好的資料 import 進機器裡面做備份
$ gpg --import gpg-private.key
gpg: key ***************: "Shawn Hsu (COMMENT) <TEST@TEST.COM>" not changed
gpg: key ***************: secret key imported
gpg: Total number processed: 1
gpg:              unchanged: 1
gpg:       secret keys read: 1
gpg:  secret keys unchanged: 1
接著寫入 Yubikey
$ gpg --edit-key xxxxxxxxx
gpg> keytocard
# 輸入 1
gpg: KEYTOCARD failed: Unusable secret key

gpg>
疑? 出現這種狀況是代表你的 private key 並不在機器上面
可是剛剛我們的確有正確引入對吧
為了確定我們有做好 import 這件事情,可以查看當前 key 的狀態
// 確認是否有正確被寫入
$ gpg --list-secret-keys
pub>  rsa4096 2022-03-11 [SC]
      xxxxxxxxxxxxxxxxxxxxxxxxxxxxxxxxxxxxxxxxxxxxx
uid           [ultimate] Shawn Hsu (COMMENT) <TEST@TEST.COM>
sub>  rsa4096 2022-03-11 [E]
sub>  rsa4096 2022-03-11 [A]
如果你有看到 key 旁邊有個 # 符號
代表找不到私鑰,但有個 reference
如果你有看到 key 旁邊有個 > 符號
很明顯,在這裡你看到了 key 旁邊有一個 > 符號,亦即私鑰並沒有被正確引入
出現這個狀況不用擔心,只要確保你的備份還在就可以了
根據 How to reimport gpg key replaced by stub 裡面所述
This is a known problem with GnuPG up to version 2.0.
You cannot import secret keys, if you already have some imported.
不過這個都多久了,居然還沒有修好
而我的 GPG 版本為
$ gpg --version
gpg (GnuPG) 2.2.19
libgcrypt 2.2.19
也難怪我沒辦法正確的 import 私鑰
那麼接下來就很容易了
根據留言內的作法
- 因為你不能擁有部份的 key import,這樣會有問題,所以第一步先將所有機器上的 key 都刪除
$ gpg --delete-secret-and-public-keys xxxxxxxxx // 接下來做確認刪除就可以了 // 你也可以用以下指令確認是否已經移除 $ gpg --list-keys $ gpg --list-secret-keys - 之後在用正常的方式一次性 import 進去就可以了
 $ gpg --import gpg-public.key gpg-private.key gpg-sub.key
 // 這裡依照需求將所有備份檔一併引入
 // 這裡會要求輸入密碼
 // 做好之後一樣可以使用以下指令做確認
 $ gpg --list-keys
 $ gpg --list-secret-keys
接下來的步驟就是將私鑰寫入 Yubikey
而這部份的操作與 Move Secret Key to Yubikey 一模一樣
跟著它操作,並且最後使用 $ gpg --card-status 查看是否正確寫入即可
Move Secret Key to YubiKey
在進行此步驟之前,請先確保上述步驟你都已經完成了
Move Primary Key into YubiKey
一樣,插入 YubiKey, 開啟 command line 輸入以下
$ gpg --edit-key xxxxxxxxx
gpg> keytocard

Really move the primary key? (y/N) y
Please select where to store the key:
   (1) Signature key
   (3) Authentication key
Your selection?

# 輸入: 1
# 輸入 passphrase 以及 Admin PIN
primary key 完成之後,接下來要把 Encrypt, Authenticate key 也都移進去 YubiKey
How to Choose Subkey
在你完成上述步驟之後,在 GPG console 上輸入 key 觀察目前狀態
gpg> key
sec  rsa4096/xxxxxxxxxxxxxxxx
     created: 2022-03-11  expires: never       usage: SC
     trust: ultimate      validity: ultimate
ssb  rsa4096/yyyyyyyyyyyyyyyy
     created: 2022-03-11  expires: never       usage: E
ssb  rsa4096/zzzzzzzzzzzzzzzz
     created: 2022-03-11  expires: never       usage: A
[ultimate] (1). Shawn Hsu (COMMENT) <TEST@TEST.COM>
它應該要長成類似上面這樣
要選擇特定的 key 進行操作,他的使用方式是 gpg> key {index}
index 是目前 key 的號碼(由上而下分別是 0 1 2)
亦即假設我現在要選擇 Encrypt Key(在上面輸出裡,他是排第 1 個位置), 選擇完成之後長這樣
gpg> key 1
sec  rsa4096/xxxxxxxxxxxxxxxx
     created: 2022-03-11  expires: never       usage: SC
     trust: ultimate      validity: ultimate
ssb* rsa4096/yyyyyyyyyyyyyyyy
     created: 2022-03-11  expires: never       usage: E
ssb  rsa4096/zzzzzzzzzzzzzzzz
     created: 2022-03-11  expires: never       usage: A
[ultimate] (1). Shawn Hsu (COMMENT) <TEST@TEST.COM>
可以看到 Encrypt Key 那一欄的 ssb 旁邊多了一個 * 號(這樣就代表目前選定這個 key 了)
如果要 “取消選擇” 就重新輸入一遍
key 1即可(toggle)
Move Encrypt Key into YubiKey
一樣,插入 YubiKey, 開啟 command line 輸入以下
gpg> key 1
sec  rsa4096/xxxxxxxxxxxxxxxx
     created: 2022-03-11  expires: never       usage: SC
     trust: ultimate      validity: ultimate
ssb* rsa4096/yyyyyyyyyyyyyyyy
     created: 2022-03-11  expires: never       usage: E
ssb  rsa4096/zzzzzzzzzzzzzzzz
     created: 2022-03-11  expires: never       usage: A
[ultimate] (1). Shawn Hsu (COMMENT) <TEST@TEST.COM>

gpg> keytocard
Please select where to store the key:
   (2) Encryption key
Your selection?

# 輸入: 2
# 因為現在是對 Encrypt Key 的移動(這裡也很好的只有列出一個不會讓你選錯)
# 輸入 passphrase 以及 Admin PIN
Move Authenticate Key into YubiKey
跟 Move Encrypt Key into YubiKey 一樣
只有 key index 以及 keytocard 那裡有點不一樣
Please select where to store the key:
   (3) Authentication key
Your selection? 3
Authentication Key 的目標儲存位置也只有一個
Verify YubiKey
上面我們成功的把 GPG Key 全部都寫入 YubiKey 裡面了
我們可以透過 $ gpg --card-status 觀察是否有成功寫入
...
Signature key ....: 0123 4567 89AB CDEF 0123  4567 89AB CDEF 0123 4567
      created ....: 2022-03-11 12:34:56
Encryption key....: 0123 4567 89AB CDEF 0123  4567 89AB CDEF 0123 4567
      created ....: 2022-03-11 12:34:56
Authentication key: 0123 4567 89AB CDEF 0123  4567 89AB CDEF 0123 4567
      created ....: 2022-03-11 12:34:56
...
如果說上述三者都有數值 基本上就完成了
Setup Info of your YubiKey
如果你有仔細看 $ gpg --card-status 你就會發現有一些欄位是空的(而它都可以透過 GPG 進行設定)
除了基本資料的修改,官方網站也強烈建議更改 PIN 以及 Admin PIN
$ gpg --card-edit
gpg/card> admin

# 啟用 admin function
# 然後就可以改密碼了

gpg/card> passwd
Test GPG sign works or not
為了要驗證是否可以進行簽名以及加密
考慮以下實驗
$ cd /tmp
$ echo test > gpg_test.txt
# 將 YubiKey 插入
$ gpg --clearsign -o gpg_test2.txt gpg_test.txt
$ gpg --verify
如果 GPG 成功簽名你會得到以下輸出
gpg: Signature made 廿廿二年三月十一日 (週五) 〇時〇分
gpg:                using RSA key xxxxxxxxxxxxxxxxxxxxxxxxxxxxxxxxxxxxxxxx
gpg: Good signature from "Shawn Hsu (COMMENT) <TEST@TEST.COM>" [ultimate]
如果把金鑰拔掉,就無法正確進行簽名
回歸我買 YubiKey 的重點,我想要能夠跨平台的使用 GPG key
所以接下來就是實測能不能跨平台使用
主要的概念其實很簡單 在使用的機器上必須要有 public key 就可以了
而要怎麼樣拿到 public key 呢?
- 將 public key 上傳到 keyserver(e.g. keyserver.ubuntu.com)
- 手動將 public key import 到機器上
Note: 上傳到 keyserver 的 public key 是沒辦法被刪掉的哦
手動上傳的方式就是你必須有 public 的檔案(或文字)
取得 GPG public key 的方法是
$ gpg --export --armor xxxxxxxxx > gpg-public-key
接著在 target machine 上面執行
# prerequisite
$ mkdir ~/.gnupg
$ sudo apt update && sudo apt install -y vim gnupg2 gnupg-agent scdaemon pcscd wget
$ cd ~/.gnupg && wget https://raw.githubusercontent.com/drduh/config/master/gpg.conf

# import public key
$ gpg --import /PATH/TO/gpg-public-key
Error: gpg failed to sign the data
error: gpg failed to sign the data
fatal: failed to write commit object
如果說你在 sign 資料的時候出現這個錯誤
在 .bashrc 裡面寫入以下
export GPG_TTY=$(tty)
基本上就可以動了
你可以透過以下指令測試
$ echo "test" | gpg --clearsign
如果還是不行
那八成是 gpg-agent 因為不明原因壞掉
簡單來說,重啟 gpg-agent 就可以了
$ pkill gpg-agent
如果使用 pkill 仍然無法解決,我的話是暫時把 Yubikey 從 usb 移除,跑一次 pkill 就可以了
我試過 gpgconf, systemctl, clear gpg cache 全都沒用
Delay or Disable Yubikey OTP
我在用 Yubikey 其實用得很開心
唯一不開心的點在於說只要我稍微不小心碰到它,它就會產生 OTP
然後它就會自動貼上 OTP
雖然說 OTP 被洩漏不算太大的問題,但三不五時出來還是很討厭
Accidentally Triggering OTP Codes with Your Nano YubiKey 官方文件有提到可以關掉或者是延長 OTP 的時間
一種方法是直接關了
反正要再打開也挺容易的
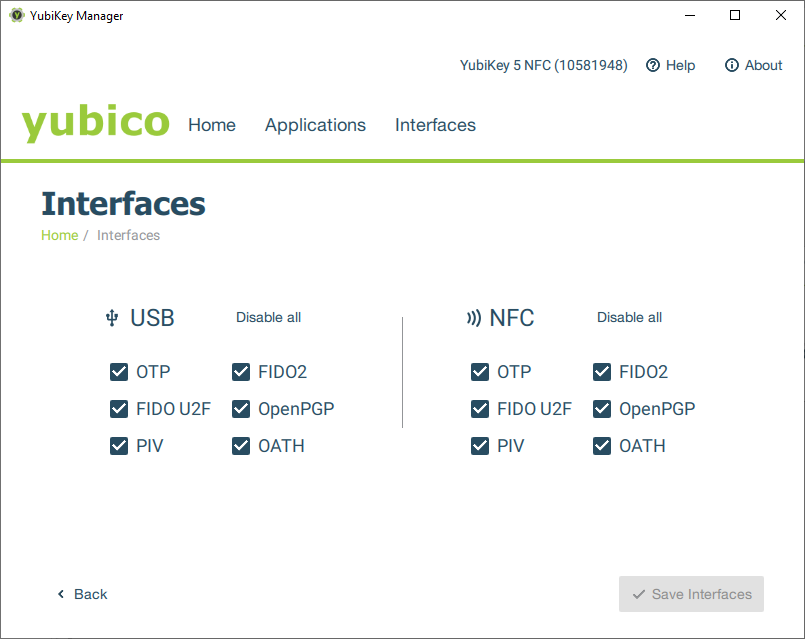
ref: YubiKey Manager
另一種則是把 OPT 的 trigger 方式改成 按住 3 秒才啟動
也就是 long press(Swapping Yubico OTP from Slot 1 to Slot 2)
slot 1 指的是 short press
slot 2 指的是 long press
ref: [question] newbie: what is slot 1 and slot 2?
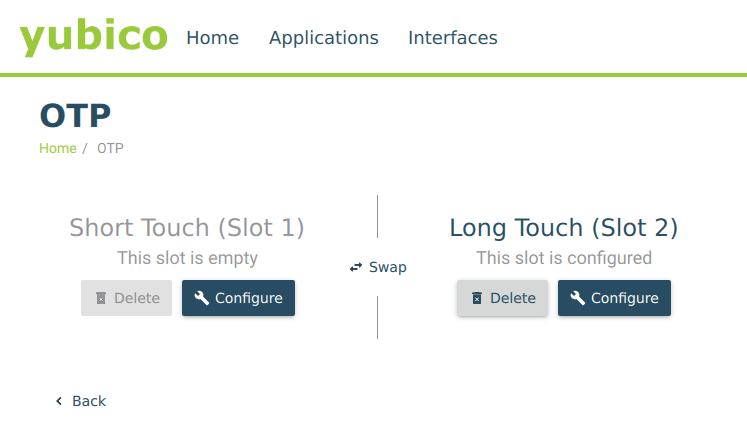
把 slot 改成 long touch 就設定好了
然後測試的方式也挺簡單的,按上去試試,它會有反應,但如果時間不夠長,它不會發 OTP
Failed connecting to the Yubikey. Make sure the application has the required permissions.
單純沒權限,要用 root
如果是 AppImage 就直接 sudo ./YubiKeyManager.AppImage 來啟動
Enable SSh with YubiKey
有了 GPG key 之外,如果 SSH key 能夠寫在 YubiKey 上面那就太好了
你別說還真有, GitHub 於 2021/05 開始支援 U2F 以及 FIDO2 安全金鑰了(GitLab 同時也支援)
GPG as SSH Key
你可以透過 GPG subkey(Authentication Key) 用以替代 SSH private key
而 Authentication Key 在上面的教學中我們已經完成了(ref: Add Authentication Key)
所以直接跳到如何把你的 GPG key 變成 SSH key 吧!
Generate Public Key
因為 GPG key 終究是跟 SSH key 長的不一樣(而且你需要 public key)
所以我們要將 GPG key 轉換為 SSH public key
$ gpg --export-ssh-key YOUR_GPG_KEY_ID
然後你就可以把輸出的公鑰貼在任何你需要他的地方(e.g. GitHub SSH keys)
你說,私鑰呢? 當然是放在 YubiKey 本體之中
需要連線的時候,將 YubiKey 插入並且輸入對應的 PIN 碼即可正確登入
設定檔不需要改變,可以維持跟原本的一樣(如下所示)
Host github
    Hostname github.com
    User xxx
注意到不能加
IdentitiesOnly yes, 因為這個的意思是使用特定路徑下的金鑰
而 Yubikey 的金鑰不存在於系統內,它必須由 Agent 去取得
因此使用 Yubikey 的情況下IdentitiesOnly以及IdentityFile都不用加
你可以用 ssh 測試一下有沒有正確設定
有用好它應該會有以下輸出
$ ssh -T git@github.com
Hi ambersun1234! You've successfully authenticated, but GitHub does not
provide shell access.
Bad owner or permissions on ~/.ssh/config
我完成所有的步驟要測試 SSH 的時候遇到 Bad owner or permissions on ~/.ssh/config 這個問題
其實滿簡單的,因為 ssh config 算是滿機密的東西,如果被其他人可以改寫就不是太好
在底下的實例你也看到上面不小心將 write 權限給予 group 了
解決辦法也很簡單,用 chmod 把 file mode 改成 644 即可
$ ls -al
-rw-rw-r-- 1 ambersun ambersun   53  三  17 03:05 config
# 可以看到上面的 file mode 跑掉了

$ chmod 644 ./config
$ ls -al
-rw-r--r-- 1 ambersun ambersun   53  三  17 03:05 config
# 正確的 file mode 應該只有 owner 可以有 write 的權限
GPG Agent Setup
# 啟用 GPG 對 SSH 的支援
$ echo enable-ssh-support >> ~/.gnupg/gpg-agent.conf

# 指定要用哪一把 key
# 這裡 key id 要用 40 bits 的 fingerprint
$ echo YOUR_GPG_KEY_ID >> ~/.gnupg/sshcontrol

# 指定 SSH 如何存取 GPG-agent
$ echo $'export SSH_AUTH_SOCK=$(gpgconf --list-dirs agent-ssh-socket)\ngpgconf --launch gpg-agent' >> ~/.bashrc
$ source ~/.bashrc
40-bit 的 fingerprint 你可以用以下指令拿到
$ gpg --show-keys --with-fingerprint gpg-key.pub
其中 gpg-key.pub 的檔案內容為你的 gpg public key 公鑰
GPG Forward Agent
如果你不知道你在幹嘛,這部份請看看就好
以我自身的例子來說,我會需要在 remote 的機器上面進行 GPG 的簽章
很明顯,使用 remote 機器代表著我不能將 GPG key 放到伺服器上面
不過這節要講的方法也很危險,除非你能信任 server,否則不要這樣做
為了能夠讓 server 能夠存取 local 的金鑰
你需要把 Agent forward 給 server
為此你需要對伺服器進行一些設定
編輯 sshd_config($ sudo vim /etc/ssh/sshd_config) 並加入以下設定
StreamLocalBindUnlink yes
並重啟
$ sudo /etc/init.d/ssh restart
local 連線的設定檔要設定 forward socket(.ssh/config)
Host server
     HostName xxx.xxx.xxx.xxx
     User user
     RemoteForward /run/user/1000/.gnupg/S.gpg-agent /run/user/1000/.gnupg/S.gpg-agent.extra
     RemoteForward /run/user/1000/.gnupg/S.gpg-agent.ssh /run/user/1000/.gnupg/S.gpg-agent.ssh
他的 syntax 是 RemoteForward [remote] [local]
要取得路徑可以使用 $ gpgconf --list-dir agent-socket 以及 $ gpgconf --list-dir agent-extra-socket
如此一來,你的 remote server 可以吃的到你的 local Yubikey 了
可以在 remote server 上面使用 $ ssh-add -l 進行驗證
再次提醒,如果你不知道你在幹嘛
請不要開啟 Agent forward 的功能
攻擊者雖然無法存取你的金鑰,但仍然可以透過給定的 socket 進行驗證,進入別的系統
詳細的教學可以參考 Yubikey forwarding SSH keys
[Deprecated] Setup ed25519-sk SSH key
雖然標示成 Deprecated,但是裡面的資訊都是 正確且經過實驗 的
主要是我發現你可以使用 GPG key 直接生成 SSH key(ref: GPG as SSH Key)
如果你已經跟著底下做完成功生成 ed25519-sk key 並且想要復原
你一樣也可以使用以下指令
$ sudo apt install yubikey-manager -y
# 如果你還沒裝 ykman, 可以用上面的指令安裝

# 列出當前 YubiKey 上的 credential
$ ykman fido list
WARNING: The use of this command is deprecated and will be removed!
Replace with: ykman fido credentials list

Enter your PIN:
ssh: 00000000000000000000000000000000000000
00000000000000000000000000 openssh

# 接著刪掉它
$ ykman fido delete ssh
WARNING: The use of this command is deprecated and will be removed!
Replace with: ykman fido credentials delete ssh

Enter your PIN:
Delete credential ssh: 00000000000000000000000000000000000
00000000000000000000000000000 openssh? [y/N]: y

# 完事後確認 credential 已經被刪掉就可以了
Prerequisite
$ sudo apt install \
      libfido2-1 libfido2-dev libfido2-doc yubikey-manager -y
Add udev rule
為了能夠讓 Linux 能夠正確識別到 YubiKey
udev 的設定是必要的
$ sudo vim /etc/udev/rule.d/90-fido.rules
並填入以下資訊
#udev rule for allowing HID access to Yubico devices for FIDO support.

KERNEL=="hidraw*", SUBSYSTEM=="hidraw", \
  MODE="0664", GROUP="plugdev", ATTRS{idVendor}=="1050"
接著重新開機就可以了
Generate Key
接著生成 key
如果你在指令中有使用到
-O verify-required(就像以下範例)
那你的 OpenSSH 有可能需要做一些調整, 詳細可以參考 Compile OpenSSH 8.4
$ ssh-keygen -t ed25519-sk -O verify-required -O resident
Generating public/private ed25519-sk key pair.
You may need to touch your authenticator to authorize key generation.
Enter PIN for authenticator:
No FIDO SecurityKeyProvider specified
Key enrollment failed: invalid format
這種情況是因為 你沒有新增 FIDO2 PIN,可參考 How to Change FIDO2 PIN
如果以上狀況都排除,你應該會得到以下輸出結果
$ ssh-keygen -t ed25519-sk -O verify-required -O resident
Generating public/private ed25519-sk key pair.
You may need to touch your authenticator to authorize key generation.
Enter PIN for authenticator:
Enter file in which to save the key (/home/ambersun/.ssh/id_ed25519_sk):
Enter passphrase (empty for no passphrase):
Enter same passphrase again:
Your identification has been saved in /home/ambersun/.ssh/id_ed25519_sk
Your public key has been saved in /home/ambersun/.ssh/id_ed25519_sk.pub
The key fingerprint is:
SHA256:SPZMDGk5TOuK21ONwTQkhaY1HpE8iDCLN4mRUbGrnqU ambersun@station
The key's randomart image is:
+[ED25519-SK 256]-+
|*=o+oO=o         |
|+=.oX.O+         |
|+ == B+oo        |
| ..o.+o=         |
|  .   o+S        |
| . . .o .        |
|. ....           |
|. +o.            |
| E. ..           |
+----[SHA256]-----+
到此為止,你就已經成功的做出 ed25519-sk Key 了
How to Change FIDO2 PIN
預設情況下 YubiKey FIDO 是沒有密碼的,因此會出現 Key enrollment failed: invalid format 的問題(Generate Key)
你可以使用 ykman 進行修改
$ ykman fido access change-pin
Compile OpenSSH 8.4
GitHub now supports SSH security keys 裡面有提到可以使用 passwordless MFA
只要你的安全金鑰有支援 FIDO2 就可以使用,但它沒說的是這個功能要 OpenSSH 8.4 以上才支援
根據 OpenSSH Release Notes 裡面提到
ssh(1), ssh-keygen(1): support for FIDO keys that require a PIN for
each use. These keys may be generated using ssh-keygen using a new
“verify-required” option. When a PIN-required key is used, the user
will be prompted for a PIN to complete the signature operation.
由上可知,OpenSSH 必須是 8.3 以上才有支援 passwordless MFA(然後 document 寫 8.2)
在我的機器上 pre-installed 是 8.2 所以要自行 compile 新版本(8.4)的
指令如下
$ sudo apt install libpam0g-dev libselinux1-dev libkrb5-dev -y
$ wget -c https://cdn.openbsd.org/pub/OpenBSD/OpenSSH/portable/openssh-8.4p1.tar.gz
$ tar -xzf openssh-8.4p1.tar.gz
$ cd openssh-8.4p1/
$ ./configure --with-kerberos5 --with-md5-passwords --with-pam --with-selinux --with-privsep-path=/var/lib/sshd/ --sysconfdir=/etc/ssh --with-security-key-builtin
$ make -j`nproc`
$ sudo make install -j`nproc`

# 你可以透過以下指令確認 ssh 版本
$ ssh -V
OpenSSH_8.4p1, OpenSSL 1.1.1f  31 Mar 2020
Git with GPG
如果都設定好,那麼接下來就都挺簡單的了
$ git config --global commit.gpgsign true
$ git config --global user.signingkey xxxxxxxxxxxx
其中 xxxxxxxxxxxx 為你的 GPG fingerprint
這樣設定完成之後,之後所有的 commit 都會預設要求簽名
40-bit 的 fingerprint 你可以用以下指令拿到
$ gpg --show-keys --with-fingerprint gpg-key.pub
其中 gpg-key.pub 的檔案內容為你的 gpg public key 公鑰
基本上這樣就可以了
可以試著簽名簽看看
簽完你可以使用 verify-commit 查看是不是有正確的簽章
$ git verify-commit HEAD
gpg: Signature made 廿廿二年五月卅日 (週一) 十九時一�
gpg:                using RSA key XXXXXXXXXXXXXXXXXXXXXXXXXXXXXXXXXXXXXXXX
gpg: Good signature from "Shawn Hsu (COMMENT) <TEST@TEST.com>" [ultimate]
Add more Accounts to GPG
如果你有多組 Email, 而他們都用同一組 GPG 的情況下
在 GitHub 上就會遇到即使你用了 GPG, 仍然是 Unverified 的情況
原因是因為你的 GPG 只有綁定一組 user id
以我的情況來說,我有兩組 email 需要使用(私人以及公司用)
所以正常情況下加一組 user id 就可以了
$ gpg --edit-key XXXXXXXXXXXXXXXXXXXXXXXXXXXXXXXXXXXXXXXX
gpg> adduid
# 然後輸入姓名,email, 註解, 密碼
Change (N)ame, (C)omment, (E)mail or (O)kay/(Q)uit? O
# 確認輸入
# 接著輸入 Yubikey 的密碼驗證
[ultimate] (1)  Shawn Hsu <TEST@TEST.com>
[ unknown] (2). Shawn Hsu <TEST2@TEST2.com>
# 這裡它會列出目前的 user id
# 可以看到第一組是我原本的,已經被設定為永遠信任
# 接下來就是要把新的 user id 加入信任名單裡面

gpg> uid 2
# 選擇特定組別的 user id, 號碼是上面括號內的
[ultimate] (1)  Shawn Hsu <TEST@TEST.com>
[ unknown] (2). Shawn Hsu <TEST2@TEST2.com>
# 選定的會用星號標示,如果要取消選擇就在輸入一次 uid 2 就會取消了(toggle)

gpg> trust
# 可以依照你的喜好決定要多信任這組 user id
# 我是選 5(亦即 ultimate trust)
[ultimate] (1)  Shawn Hsu <TEST@TEST.com>
[ultimate] (2). Shawn Hsu <TEST2@TEST2.com>

gpg> save
# 最後存檔離開就可以了
最後記得要更新公鑰
因為你已經新增了一組 user id, 公鑰的內容也會改變
$ gpg --export --armor xxxxxxxxxx
其中 xxxxxxxxxx 是 GPG 公鑰的 fingerprint
然後把公鑰更新到 GitHub 上
用好之後在 GitHub 上面看就會是長這樣
從原本的只有一個 email

變成有兩個 email

另外要移除 user id 也是類似
$ gpg --edit-key XXXXXXXXXXXXXXXXXXXXXXXXXXXXXXXXXXXXXXXX
[ultimate] (1)  Shawn Hsu <TEST@TEST.com>
[ultimate] (2). Shawn Hsu <TEST2@TEST2.com>

gpg> uid 2
# 選定第二組 user id

gpg> revuid
# 選 4(no longer valid)
# 輸入密碼做確認即可以刪除
[ultimate] (1)  Shawn Hsu <TEST@TEST.com>
[ revoked] (2). Shawn Hsu <TEST2@TEST2.com>

gpg> save
# 最後存檔離開就可以
也一樣要更新公鑰
References
- Using Your YubiKey with OpenPGP
- Resetting the OpenPGP Application on the YubiKey
- drduh/YubiKey-Guide
- PGP,OpenPGP和GnuPG加密之間的區別
- Move pgp key to new Yubikey
- Mention Key Derived Format
- What is the difference between Key, Certificate and Signing in GPG?
- How to gpg sign a file without encryption
- 如何調整 GnuPG 背景執行 gpg-agent 時的相關設定並延長密碼快取期限
- 安装selinux标头
- openssh/openssh-portable
- Is possible to upgrade openssh-server OpenSSH_7.6p1, to OpenSSH_8.0p1?
- GitHub now supports SSH security keys
- How to configure SSH with YubiKey Security Keys U2F Authentication on Ubuntu
- How to use FIDO2 USB keys with SSH
- Building OpenSSH 8.2 and using FIDO2 U2F on ssh authentication
- libfido2
- OpenSSH Release Notes
- How to enable SSH access using a GPG key for authentication
- Bad owner or permissions on ssh config file
- Generate fingerprint with PGP Public Key
- 利用 GPG 簽署 git commit
- Verifying signed git commits?
- One GnuPG/PGP key pair, two emails?
- How to remove an email address from a GPG key
- Yubikey forwarding SSH keys
- SSH Configuration
Leave a comment