DevOps - 從 GitHub Actions 初探 CI/CD
CI/CD
Continuous Integration - CI 是現今軟體開發流程當中的一種 best practice
開發的過程當中,我們有可能在實作中不小心改壞了一個東西,又剛好 QA 沒有測出來直上 production
這時候出問題就比較麻煩了對吧?
於是乎持續整合的概念就被提出來
我們可以透過某種方式在上版或是部屬到 production 上面之前先把我們的程式都完整的測試過一遍
這樣 出錯的機率是不是就會小的很多了
通常 CI 裡面會搭配各種測試
這些測試方法就讓我們拉出來獨立探討
可參考
DevOps - 單元測試 Unit Test | Shawn Hsu
DevOps - 整合測試 Integration Test | Shawn Hsu
而實務上來說 CI 就是負責執行以上的事物(包括但不限於 security check, code coverage, functional test and custom check)
Continuous Deployment - CD 持續部屬
傳統的部屬方式是手動部屬到遠端伺服器上,而現在你也可以透過自動部屬的方式上 code
透過自動化的 build code, test code 可以讓開發者更專注於專案開發
GitHub Actions
跑 CI/CD 有兩種方式,一個是在 local 自己起一個 CI server,另一個 solution 就是使用線上平台諸如 GitHub Actions, Travis CI, CircleCI 等等的
那我要怎麼樣 trigger CI 呢?
GitHub Actions 有多種 event 可以選擇(e.g. push code, new issue, schedule … etc.)
現在就讓我們來看看如何設定你的 GitHub Actions 吧
GitHub Actions Component
當某個 event 被觸發的時候, CI 就會執行某項動作,但我要怎麼指定他要跑哪些東西呢?
步驟、指令是由 YAML 檔撰寫而成,而裡面包含了若干 component
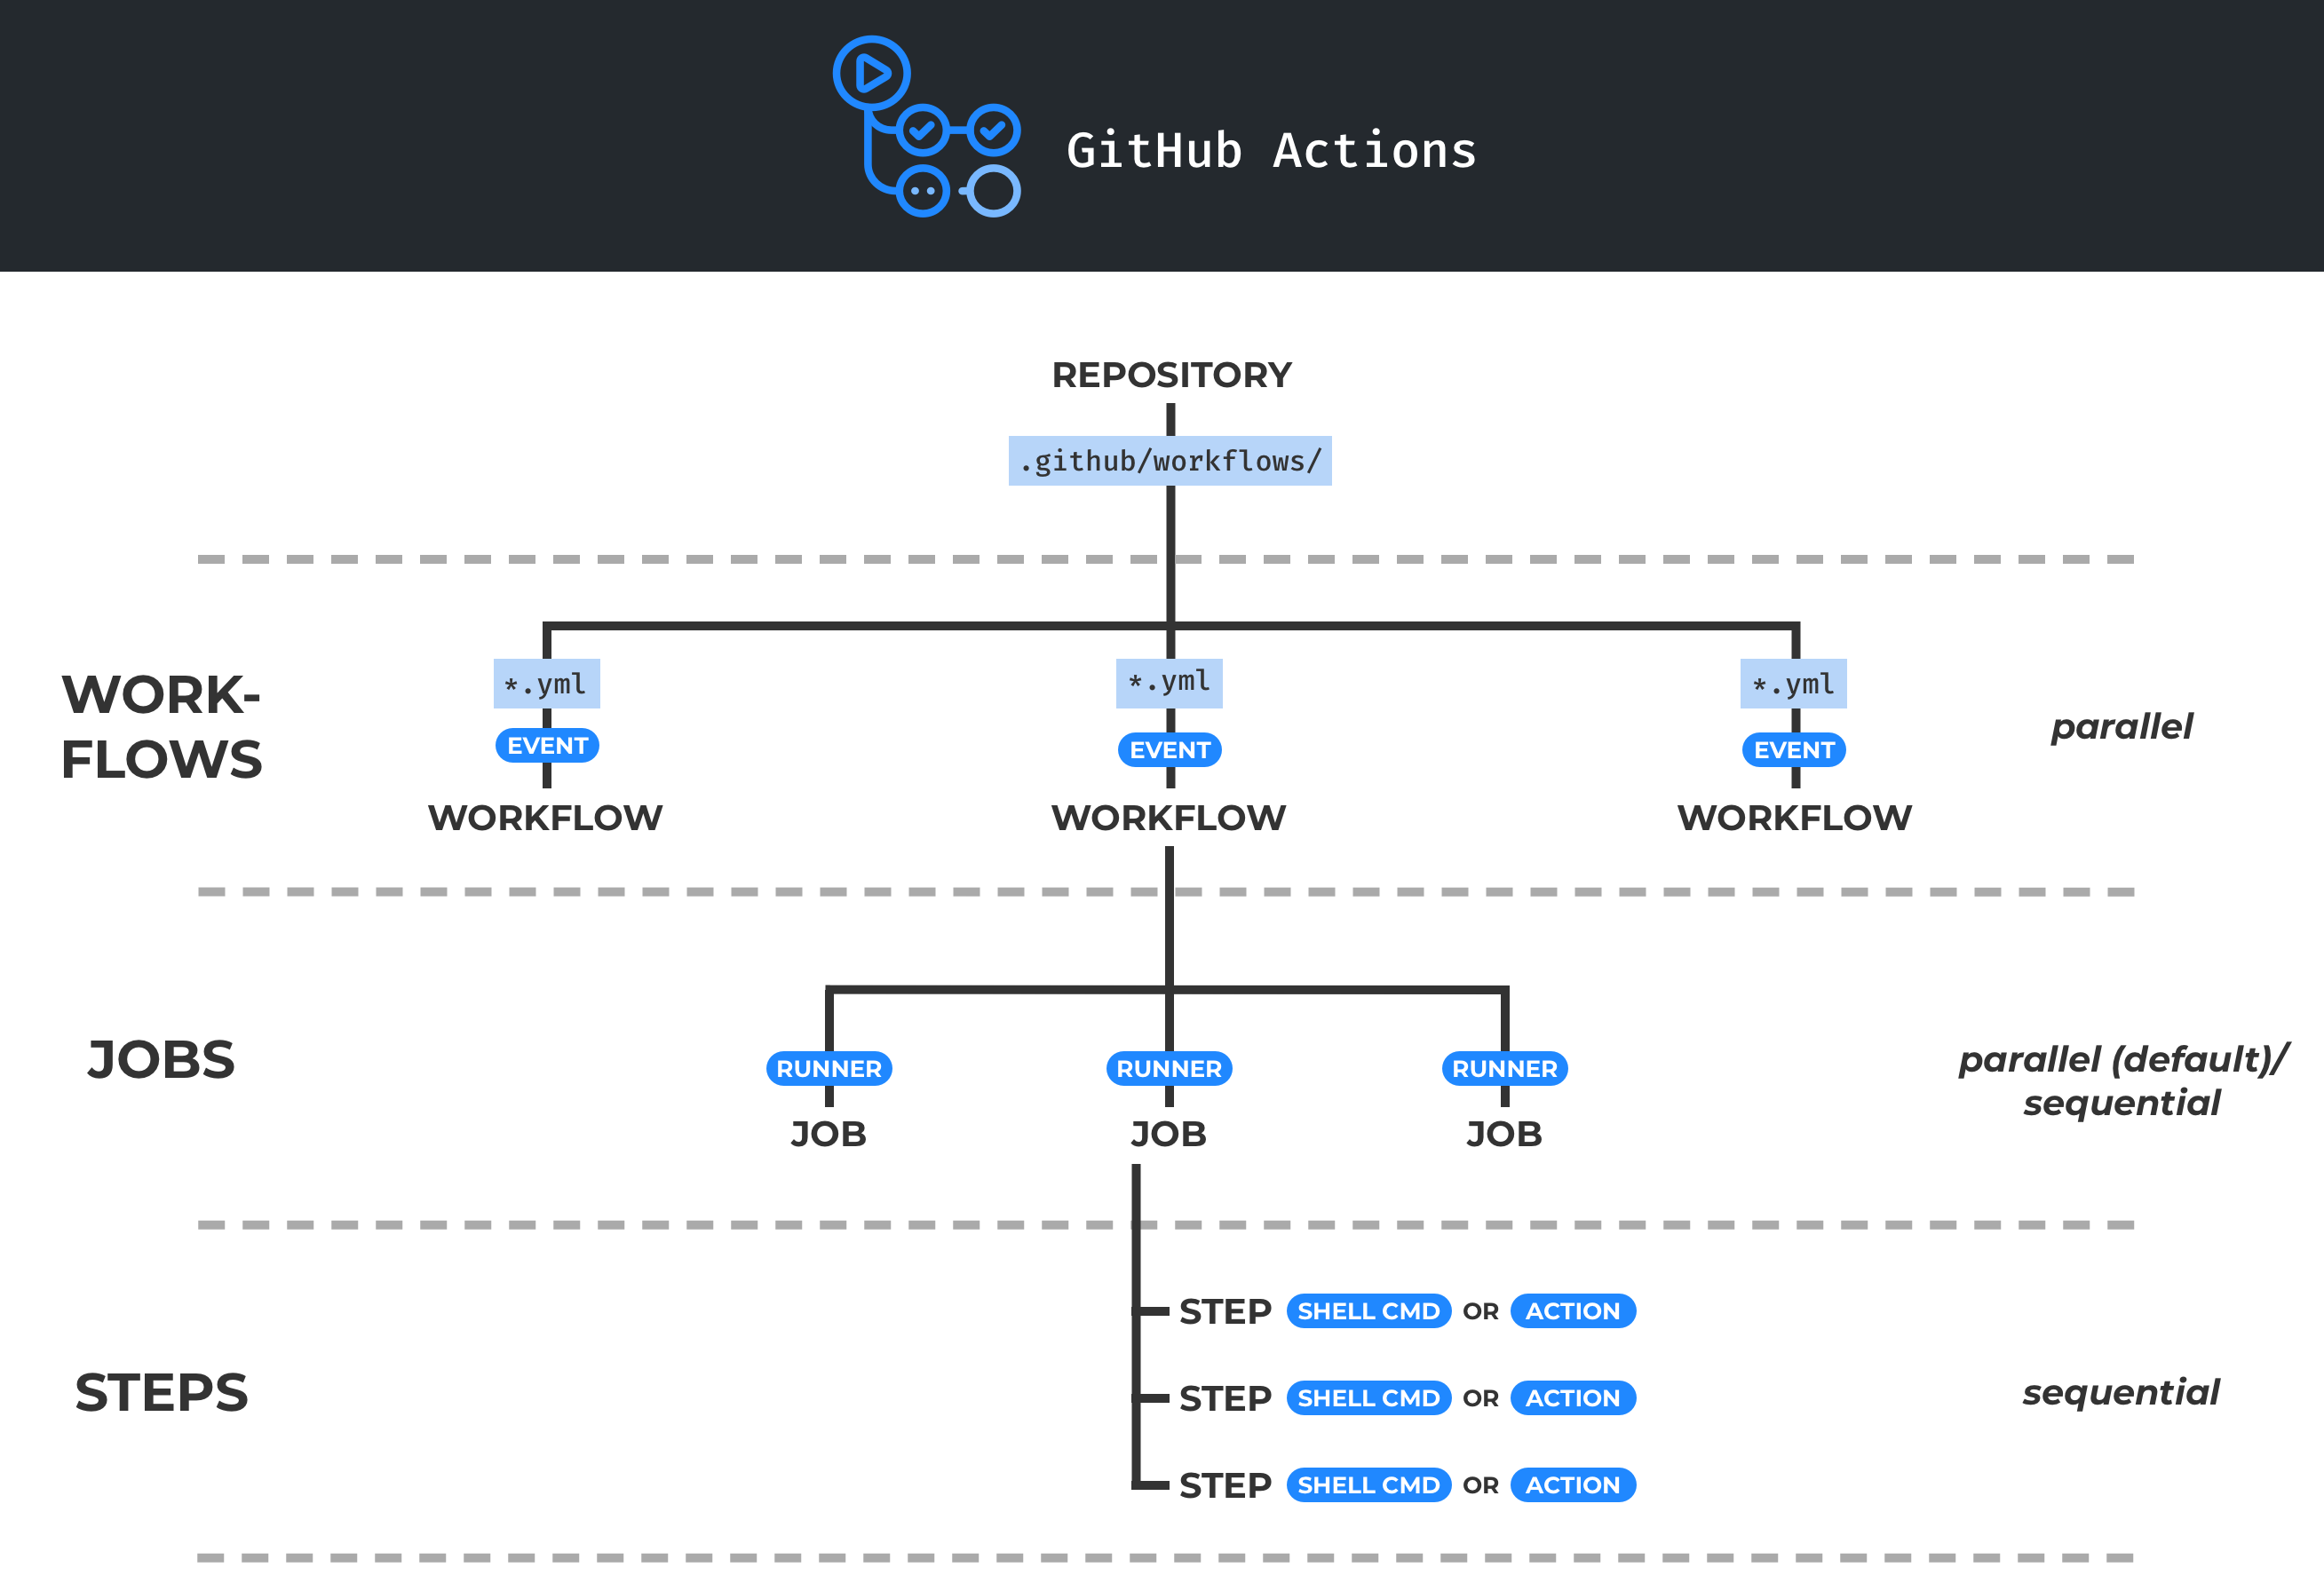
接下來就讓我們仔細的觀察每個 component 以及其關係圖

Workflow
觸發執行單元,裡面包含了若干執行步驟
通常一個 repo 裡面可以有多個 workflow 分別對應到不同的場景(e.g. build and test 是一個, deploy 又是另外一個)
每個 workflow 都由一個 yaml 檔定義詳細的步驟
Events
觸發 workflow 的事件(e.g. push code)
1
2
3
4

on:
  push:
    branches:
      - 'master'
完整 event 列表可以到 Events that trigger workflows 查詢
Jobs
裡面具體描述了該如何執行, 比如說 scripts 或是 actions
一個 job 可以對應一個 runner(意思是多個 job 可以平行化處理在多個 runner 上)
假設你要跑一個 unit test
但是,它可能會有一些前置步驟必須要做,jobs 裡面就是詳細定義這些 “步驟”
比如說
- git pull source code
- 設定環境
- 下載第三方套件(e.g.
$ go mod download) - 跑測試
你可以看到,單單一個 unit test 的 job 需要做至少 4 個步驟
必須要完成一個,下一個才會執行
Actions
對於重複性 task(e.g. environment setup)
你可以把它寫成 task 然後在 job 裡面調用
如同你在 Jobs 裡面看到的範例一樣,我可以把其中一個 “步驟” 單獨的拉出來定義成 action
這樣就可以重複利用,在別的 jobs 可以直接 reuse
如果你願意,甚至可以將 action 上架到 GitHub Marketplace
比如說我的其中一個 action(Hardhat Test)

上架到 marketplace 需要設定 branding 相關參數,你可以參考 action.yaml
網路上也有人貼心的準備了一個 cheat sheet, 可參考 GitHub Actions Branding Cheat Sheet
Runner
CI 伺服器,可以是 local 或是 remote 的
GitHub Actions 提供了多種平台可以選擇(e.g. Linux, Windows 以及 macOS)
有關 local runner 的部分可以參考 DevOps - 透過 Helm Chart 建立你自己的 GitHub Action Local Runner | Shawn Hsu
Variables
Environment Variables
在 yaml 檔中你可以看到 ${{ xxx }}
他是代表你可以透過 context 使用所謂的環境變數
一種方式是在 yaml 當中直接定義(如下所示)
1
2
3
4
5
6
7
8

env:
  DAY_OF_WEEK: Monday

inputs:
  DAY:
    description: 'Specify the day of week'
    required: false
    default: ${{ env.DAY_OF_WEEK }}
另一種是使用 GitHub 提供的環境變數
| env | description |
|---|---|
| GITHUB_REPOSITORY_OWNER | repo owner’s name, e.g. ambersun1234
|
| GITHUB_REPOSITORY | owner 以及 repo name, e.g. ambersun1234/AART
|
| GITHUB_REF | trigger action 的各種資訊,它可以是brach refs/heads/<brach-name>tags ref/tags/<tag-name>PR refs/pull/<pr-number>/merge |
上面的環境變數在 context 裡面多半都有對應可以使用
比方說 GITHUB_REF 與 github.ref 是等價的
關於 github context 的 document 可以參考 github context
其他內建提供的環境變數內容可以參考官方文件 Environment variables
GitHub Secrets
Secrets 顧名思義就是機密的資訊
什麼時候你會需要用到比較機密的資訊呢?
比方說你需要將 CI 完成的 docker image 推上 docker hub
聰明的你肯定發現,要上傳 image 需要做 authentication
最爛的作法當然是把你的密碼明文貼在程式碼裡面 ( ![]()
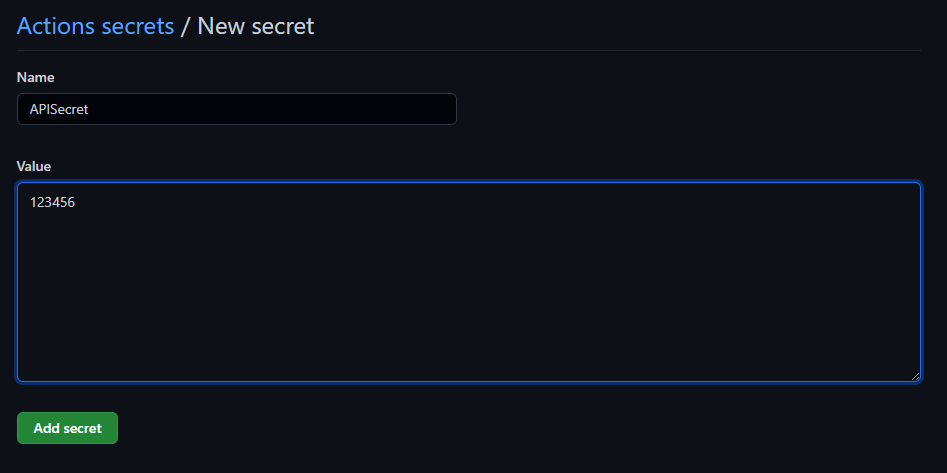
所以這時候你就可以把密碼貼在所謂的 GitHub Secrets 裡面了
詳細的設定方法可以參考 Set up Secrets in GitHub Action workflows
每個 repo 擁有獨立的 secrets,目前沒有所謂的全局的 secrets
使用方式呢 一樣很簡單,語法跟 context 一樣
1

${{ secrets.<name> }}


ref: GitHub Action YAML 撰寫技巧 - 環境變數(Environment Variables) 與 秘密 (Secrets)
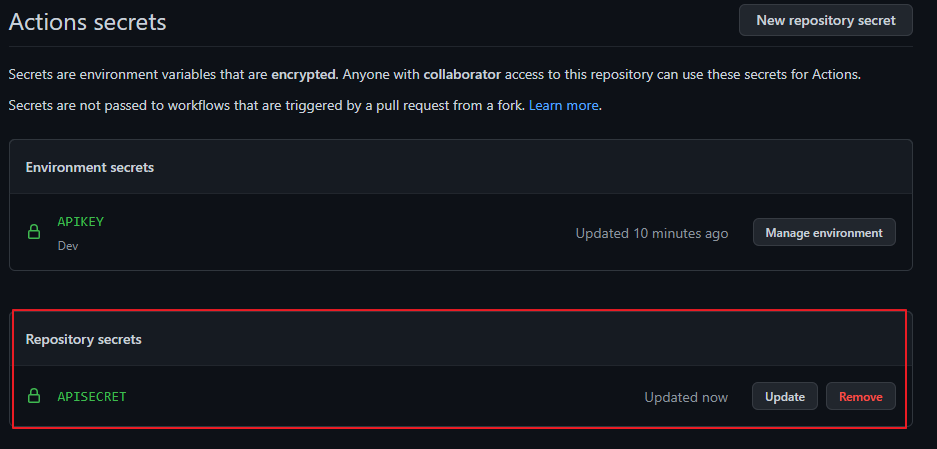
注意到 secrets 的名字的使用,從上圖你可以看到 GitHub web UI 呈現的會是 全部大寫的
但是在你使用的時候,請記得一律是遵照 建立的時候的大小寫
也就是使用 ${{ secrets.APISecret }}
如果你在跑 action 發現了 Unrecognized named-value: 'secrets'
這邊要注意一件事
secrets 這個 context 只能在 workflow 存取
啥意思呢?
你在客製化 action 的時候會需要寫一份 action.yml 對吧
你要用客製化的 action 需要在寫一份 workflow
這兩個檔案是不同的,需要將它分清楚
secrets context 只能寫在 workflow 裡面(其他 context 可以在 action.yml 取得)
寫在 action.yml 它會抓不到
GitHub Token
要特別注意的是一個特殊的 secrets - GITHUB_TOKEN
這個是會自動建立的 secrets, 使用方法如上所示(${{ secrets.GITHUB_TOKEN }})
它可以 有限度的 存取 特定 GitHub 資源
比方說你想要有可以讀取或新增 Pull Request comment, 你可以透過 token 訪問 GitHub REST API 進行操作
secrets.GITHUB_TOKEN 你可以把它當作 Personal Access Token - PAT, 他們的作用大致上相同
Token Lifecycle
基於 token 安全性著想,GitHub 自動生成的 token 並不會永久的存在
token 是會 timeout 的,主要有兩個時間點
- 當 action job 完成的時候就會刪除
- 基於其他原因,token 最多也只能存活 24 小時
Token Permissions
你可以針對 repo 的 action 進行微調,基本上有三種模式(permissive, restricted 以及 fork)
前兩者你可以在 repo settings 裡面調整(可以參考 Setting the permissions of the GITHUB_TOKEN for your repository),fork 是針對 fork 出去的 repo 做限制
這邊列出幾個比較重要的權限(完整權限可以參考 Permissions for the GITHUB_TOKEN)
| scope | Default access(permissive) | Default access(restricted) |
|---|---|---|
| actions | read/write | none |
| contents | read/write | read |
| issues | read/write | none |
| pull-requests | read/write | none |
| pages | read/write | none |
Implement Your Own GitHub Actions
定義一個客製化的 action 非常簡單,你只要指名 輸入, 輸出 以及 程式進入點 就可以了
而上述的資料必須寫在一個名為 action.yml(或 action.yaml) 當中就可以了
而 action 共有 3 大類
| Type | Docker container | JavaScript | Composite |
|---|---|---|---|
| Operating System | Linux | Linux macOS Windows |
Linux macOS Windows |
| Speed | slow | fast | x |
| Customizable | yes | no | x |
-
Docker Container Actions
- Docker container actions 因為是跑在 Docker 之上,所以其高度客製化,並且也由於容器的特性使得他的執行速度相較於 JavaScript actions 還要來的慢(因為你要啟動 container), 並且 runner machine 只支援 linux 以及上面必須安裝 Docker
-
Javascript Actions
- JavaScript actions 可以以原生的方式跑在 3 大系統上面,在要求限制上面明顯沒有這麼多,你只能使用 pure JavaScript 以及不得依賴任何 binary(actions/toolkit 除外)
- 如果要用其他第三方的 package, 你可以用 webpack 之類的工具全部打包在一起,就不會受到限制了
-
Composite Actions- Composite actions 是將多個 actions 合併成一個 actions, 他的目的最主要是減少 duplication 而已, 詳細可以參考 GitHub Actions: Reduce duplication with action composition
Action.yaml
1
2
3
4
5
6
7
8
9
10
11
12
13
14
15
16
17
18
19
20
21
22
23
24
25
26
27
28
29
30
31
32
33

# action.yml

name: 'Issue assign all collaborators'
description: 'Assign all collaborators to issues in repository'
author: 'ambersun1234'
inputs:
  owner:
    description: 'The owner of this repository'
    required: true
    default: ${{ github.repository_owner }}
  repository:
    description: 'The repo name of this repository'
    required: true
    default: ${{ github.repository }}
  issue_num:
    description: 'The issue number'
    required: true
    default: ${{ github.event.issue.number }}
  api_url:
    description: 'The GitHub REST API url'
    required: true
    default: ${{ github.api_url }}
  token:
    description: 'This is GitHub token'
    required: true

runs:
  using: 'docker'
  image: 'Dockerfile'

branding:
  icon: box
  color: yellow
上述是最基本的 action.yaml
其中有幾個東西是必要的 name, description 以及 runs
如果有需要也可以視情況新增 inputs, outputs, branding
-
name- 簡單,就是這個 action 的名字
-
description- action 的描述
-
runs- 最重要的一部分,它定義了你的這個 action 該如何執行
-
inputs- 定義輸入,可以有多個數值(e.g.
inputs.my_name)- 而每個數值它裡面 必須 要有
description以及required,default預設數值是可加可不加
- 而每個數值它裡面 必須 要有
- 要如何在 JS runtime 或者是 docker container 裡面取得你的輸入呢?
- GitHub Action 會對所有的輸入值建立對應的 環境變數, 而他的形式是
INPUT_<VARIABLE>(以inputs.my_name來說,環境變數會變成INPUT_MY_NAME) - 它會是全大寫且會將 空格 替換成 底線
- GitHub Action 會對所有的輸入值建立對應的 環境變數, 而他的形式是
- 定義輸入,可以有多個數值(e.g.
-
outputs- 注意到這裡的 output 不是拿來當作 console log 用的, 這裡的 output 是指將 action 輸出儲存下來,讓其他 step 可以透過 context 取得
- 如果說你只是想要看它 log 到 console 那你其實用一般的 echo 就可以了
- 既然他的 output 是傳到其他 action 使用,所以你的 action.yml 裡面要定義輸出(如下所示)
1
2
3
4
5
6
7
8
9
10
11

  # action.yml

  inputs:
  my_name:
      description: 'This is my name'
      required: true
      default: 'Shawn Hsu'

  outputs:
  my_name_uppercase:
      description: 'This is my upper case name'
- 注意到這裡的 output 不是拿來當作 console log 用的, 這裡的 output 是指將 action 輸出儲存下來,讓其他 step 可以透過 context 取得
-
branding- 如果你要上架你的 action, branding 的部份可以參考,他是定義你的 action 的圖示與顏色
Docker Container Actions
一直以來我都是使用 GitHub issue 作為我部落格開發項目的紀錄
而當我新增一個新 issue 的時候 我都希望它可以自己將 assignee 自動填入我的帳號
所以 心動不如行動
actions.yaml 當中,如果是 docker container actions 的話,事情會有點不同,來看看吧
-
runs-
runs.using 只能是
只能是 docker -
runs.image 它可以是
它可以是 Dockerfile或是 public registry image(e.g.docker://debian:stretch-slim)
-
-
inputs- 注意到如果是使用 docker container, 事情會有一點不同,我們必須手動將環境變數傳入 container
- 也就是你在寫
runs的時候要多加 args, 整體的寫法就會是這樣
1
2
3
4
5
6
7
8
9
10
11
12

  # action.yml

  inputs:
    my_name:
      description: 'This is my name'
      required: true
      default: 'Shawn Hsu'
  runs:
    using: 'docker'
    image: 'docker://debian:stretch-slim'
    args:
      - ${{ inputs.my_name }}
- 那麼他在環境變數的使用上跟上面一樣, 可參考 Environments Variable
- 也就是你在寫
- 注意到如果是使用 docker container, 事情會有一點不同,我們必須手動將環境變數傳入 container
-
outputs- 為了使下一個 step 的 action 能夠取得上一層 action 的輸出,你在 Docker container 裡面的執行檔裡面要這樣寫
1
2

  my_name_uppercase='SHAWN HSU'
  echo "::set-output name=my_name_uppercase::${my_name_uppercase}"
- 最後在 workflow 裡面你就可以拿到從其他 step 裡面傳出來的輸出了
1
2
3
4
5
6
7
8
9
10
11
12
13
14

  # workflow

  on: [push]

  jobs:
    issue-assign-all-collaborators:
      runs-on: ubuntu-latest
      name: Test on act
      steps:
        - name: Assign all collaborators
          uses: ./action.yml
          id: collaborators
        - name: Get collaborators
          run: echo "${{ steps.collaborators.outputs.owner}}"
- 因為你要拿到上一個步驟的 action 值,所以你需要透過特定 id 存取特定步驟(像上面就是標了一個 id collaborators)
docker://debian:stretch-slim對應到 Docker hub 上面的 debian:stretch-slim
詳細實作程式碼你可以在 ambersun1234/issue-assign-all-collaborators 中找到
Javascript Actions
相比於 Docker Container Actions, javascript actions 在實作上面會稍微方便一點
-
runs-
runs.using 定義了你要用哪一個 runtime(可以是
 node12,node16) -
runs.main 定義了程式進入點,要用哪一個檔案跑 action(e.g.
 main.js, 其內容為客製化)
-
-
inputs&outputs- 相較於使用 Docker Container Actions 需要額外的動作傳遞參數,js 版本的完全不需要這樣做
接下來就看看 js 要怎麼寫吧
1
2
3
4
5
6
7
8
9
10
11
12
13
14
15
16
17
18
19
20
21
22
23
24
25
26
27
28
29
30
31
32
33
34
35
36
37
38
39
40
41
42
43
44
45
46
47
48
49
50
51
52
53
54
55
56
57
58
59
60
61
62
63
64
65
66
67
68
69

import * as core from "@actions/core";
import * as cli from "@actions/exec";
import * as fs from "fs";
import * as path from "path";
import { ethers } from "ethers";

const packageManagerFileMap = new Map<string, string>([
    ["yarn", "yarn.lock"],
    ["npm", "package-lock.json"]
]);

const packageManagerCommandMap = new Map<string, string>([
    ["yarn", "yarn install"],
    ["npm", "npm install"]
]);

const packageManagerRunCommandMap = new Map<string, string>([
    ["yarn", "yarn"],
    ["npm", "npx"]
]);

const localNetwork = "hardhat";

const fileExists = (lockFileName: string): boolean => {
    return fs.existsSync(path.join(process.cwd(), lockFileName));
};

const main = async () => {
    const network = core.getInput("network");
    const privateKey =
        core.getInput("private_key") ||
        ethers.Wallet.createRandom().privateKey.slice(2);
    const rpcUrl = core.getInput("rpc_url");
    const networkArgs = ["--network", network];

    if (network !== localNetwork) {
        if (privateKey === "") {
            core.setFailed("Private key not found");
            return;
        }
        if (rpcUrl === "") {
            core.setFailed("RPC url not found");
            return;
        }
    }

    const content = `
        PRIVATE_KEY=${privateKey}
        ${network.toUpperCase()}_RPC_URL=${rpcUrl}
    `;
    fs.writeFileSync(path.join(process.cwd(), ".env"), content, { flag: "w" });

    for (let [packageManager, file] of packageManagerFileMap) {
        if (fileExists(file)) {
            await cli.exec(packageManagerCommandMap.get(packageManager)!);
            await cli.exec(
                `${packageManagerRunCommandMap.get(
                    packageManager
                )} hardhat test`,
                networkArgs
            );
            break;
        }
    }
};

main().catch((e) => {
    core.setFailed(e);
});
不要看細部實作的話,是滿好懂的
定義一個 main function, 裡面透過 @actions/core 取得輸入,@actions/exec 執行指令
重點就只是 core.getInput() 以及 cli.exec() 僅此而已
當然你要設定輸出可以使用 core.setOutput()
詳細實作程式碼你可以在 ambersun1234/hardhat-test-action 中找到
Test GitHub Action locally
測試 GitHub Action 是一個有點尷尬的問題
開一個 repo 上去實測也..我覺的有點牛刀的感覺
nektos/act 是一款可以在本機測試 Action 的工具
因此我們就不用大費周章的建立測試環境了
Installation
1
2
3

$ wget https://raw.githubusercontent.com/nektos/act/master/install.sh
$ sudo bash install.sh
$ sudo mv bin/act /usr/bin
Test
安裝好之後你可以直接進行測試
1
2
3
4
5
6
7
8
9
10
11

$ cd issue-assign-all-collaborators
$ act
[issue.yml/test] 🚀  Start image=ghcr.io/catthehacker/ubuntu:full-20.04
[issue.yml/test]   🐳  docker pull image=ghcr.io/catthehacker/ubuntu:full-20.04 platform= username= forcePull=false
[issue.yml/test]   🐳  docker create image=ghcr.io/catthehacker/ubuntu:full-20.04 platform= entrypoint=["/usr/bin/tail" "-f" "/dev/null"] cmd=[]
[issue.yml/test]   🐳  docker run image=ghcr.io/catthehacker/ubuntu:full-20.04 platform= entrypoint=["/usr/bin/tail" "-f" "/dev/null"] cmd=[]
[issue.yml/test]   🐳  docker exec cmd=[mkdir -m 0777 -p /var/run/act] user=root workdir=
[issue.yml/test] ⭐  Run Run issue assign all collaborators
[issue.yml/test]   ❌  Failure - Run issue assign all collaborators
[issue.yml/test] file does not exist
Error: Job 'test' failed
那尼? 為什麼會這樣子呢?
後來我改了一下 action run step 發現到,container 裡面完全沒有 action 資料
1
2
3
4

[issue.yml/test]   🐳  docker exec cmd=[bash --noprofile --norc -e -o pipefail /var/run/act/workflow/0] user= workdir=
| total 8
| drwxr-xr-x 2 root root 4096 Apr  8 07:41 .
| drwxr-xr-x 3 root root 4096 Apr  8 07:41 ..
所以看起來是要 mount 或 copy 之類的,查找 README 果然有 -b binding 的參數(只不過它沒有特別標出來就是)
在跑之前你也可以先確定 act 有沒有正確讀到 action
1
2
3
4
5

$ cd issue-assign-all-collaborators
$ act -l
Stage  Job ID                          Job name  Workflow name  Workflow file  Events
0      issue-assign-all-collaborators  test      issue.yml      issue.yml      push
$ act -b
跑下去之後發現 怎麼我改了 code 輸出沒改變呢?
因為你要重新 build image, 可以使用 --rebuild 讓每一次都使用最新 image
1
2

$ cd issue-assign-all-collaborators
$ act -b --rebuild
如此一來,你就可以在本機測試了
不過我後來發現阿,因為我是跑 shell script, 所以不用 act 好像也沒什麼差別笑死
詳細實作程式碼你可以在 ambersun1234/issue-assign-all-collaborators 中找到
Continue on Error
基本上 workflow 的內容你都會希望他執行正確
但有時候又不是這麼一回事
舉例來說,有一個 job 的內容是讓他背景執行一些東西
由於 API limit 限制,他可能會失敗
需要等到 request 的內容減量他才會成功
所以這個是可以接受的
GitHub Action 提供了一個 continue-on-error 的參數
基本上可以 bypass 掉上面的問題
1
2
3
4

steps:
    ...
    - name: Create Search Index
    continue-on-error: true
在有可能會失敗的 step 的地方可以加上這個參數
即使執行失敗,在 Action 裡面仍然視為成功並且會繼續執行下去
Skip workflow
有時候你可能需要跳過 workflow,不管是出於不想跑測試或者是需要快速上版
可以使用以下特殊指令
| First line commit message | Non-first line commit message |
|---|---|
[skip ci] |
skip-checks:true |
[ci skip] |
skip-checks: true |
[no ci] |
|
[skip actions] |
|
[actions skip] |
舉個例子,commit message 可以這樣寫
1
2
3
4
5

[skip ci] Add integration test setup

Due to chainlink vrf callback gas set limit to low
Currently I couldn't test the code on chain
Disable integration test action at GitHub, re-enable it when fix the above issue
ref: https://github.com/ambersun1234/nft/commit/95047600c90eb5d86e4cb8227f163c595ca45777
skip-checks: true 這種寫法必須在 commit message 保留兩行空白,接著 skip-checks: true 的指令
我試了一下發現是不行的,不太確定哪裡有做錯
Command in First line Message
to be continued
How to speed up Docker Container Action
從上面的討論你應該可以很清楚的發現到
因為 action.yml 裡面我們是定義 Dockerfile, 亦即每次都要跑 Docker build
那有沒有加速的方法? ㄟ它除了每次 build 的選項以外,你還可以指定 public registry image 阿
所以我有特地分別觀察了一下實際執行時間
- 使用 Docker Build 耗時:
12 seconds - 使用 pre build Docker image 耗時:
4 seconds
整整快了 3 倍阿
另外整體 duration time 提昇了約 66%
詳細的數據我沒有特別測試,但你可以在 issue-assign-all-collaborators#9 與 issue-assign-all-collaborators#10 找到相關數據
References
- Understanding GitHub Actions
- 4 Steps to Creating a Custom GitHub Action
- nektos/act
- Get pull request number from action
- Events that trigger workflows
- Environment variables
- About custom actions
- Metadata syntax for GitHub Actions
- Setting an output parameter
- jobs id
- Automatic token authentication
- Webhook events and payloads
- Skipping workflow runs
Leave a comment