邁向 Angular 前端工程師之路 - Lifecycle Hooks
Why do we Need Lifecycle Hook
Angular 在一開始初始化 component,他的生命週期就開始了
為了使 component 更人性化一點,舉例來說我們希望在特定的時間做特定的事情
當資料改變的時候,我們希望重新 render 畫面,這時候 lifecycle hook 就很好用了
Lifecycle Hook

Angular 提供多種的 lifecycle hook 供使用
你可以依照自己的需求,使用某些部份的 hook 即可,不需要全部都實作
@angular/core package 提供了一系列的 interface, 實作的時候,他的 function name 需要 prefix ng
也就是 OnChanges 會是 ngOnChanges
lifecycle hook 一個重點是,他的執行順序
上圖是所有的 hook 的執行順序,接下來就一個一個看下去吧
OnChanges
第一個執行的是,change detection hook, function 如其名,它會偵測所有 @Input 的異動
當有任何改變的時候,onChanges 就會被呼叫
看個例子
@Component({
    selector: 'app-component',
    templateUrl: './app.component.html',
    styleUrls: './app.component.scss'
})
export class AppComponent implements OnChanges {
    @Input() currentBalance: BigNumber;

    ngOnChanges(changes: SimpleChanges): void {
        if (
        changes['currentBalance'] != null &&
        changes['currentBalance'].currentValue !== null
        ) {
            console.log(changes['currentBalance'].previousValue)
            console.log(changes['currentBalance'].currentValue)
        }
    }
}
onchange function 吃一個參數,SimpleChange 實作 SimpleChanges interface, 定義如下
class SimpleChange {
  constructor(previousValue: any, currentValue: any, firstChange: boolean)
  previousValue: any
  currentValue: any
  firstChange: boolean
  isFirstChange(): boolean
}
你可以透過檢查 changes 有沒有包含你的 input name, 判斷說當下這個值有沒有改變
要注意的是,如果你的 component 並不包含任何的 @Input, 即使你實作了 onChanges, 它也不會被呼叫
OnInit
跟 constructor 不同的是,onInit hook 被呼叫的時候,component 已經完成初始化了
constructor 不應該做任何讀取設定資料等等的
因為有可能初始化還未完成,因此這些事情適合等到 onInit 的時候處理
像是 @Input 在 constructor 當中是無法存取到的
與 constructor 相同的是,onInit 也只會被呼叫一次
constructor 就我的經驗來看,只會放 Dependency Injection 相關的初始化而已
像是 variable 的初始化或者是你有 Subject 或 Observable 之類的要定義,基本上都會在 onInit
for example
@Component({
    selector: 'app-component',
    templateUrl: './app-component.html',
    styleUrls: './app-component.scss'
})
export class AppComponent implements OnInit {
    @Input() userState$: Observable<UserState>;

    ngOnInit(): void {
        this.userState$.pipe(filter((state) => !!state)).subscribe((state) => {
        if (state.Token !== null) {
            this.router.navigateByUrl('/');
        }
    });
  }
}
DoCheck
我們不是有了 onChanges hook 了嗎? 為什麼還需要一個 change detection hook
仔細看 onChanges 的定義你會發現,它只會對 Input 有反應,亦即如果今天你要偵測的對象不是 Input, 那 Angular 就不會有反應
借用 Why do we need ngDoCheck 解答
@Component({
   selector: 'test-do-check',
   template: `
      <div [innerHtml]="obj.changer"></div>
   `,
    changeDetection: ChangeDetectionStrategy.OnPush
})
export class TestDoCheckComponent implements DoCheck, OnInit {
    public obj: any = {
       changer: 1
    };

    private _oldValue: number = 1;

    constructor(private _changeRef: ChangeDetectorRef){}

    ngOnInit() {
       setInterval(() => {
          this.obj.changer += 1;
       }, 1000);
    }

    ngDoCheck() {
       if(this._oldValue !== this.obj.changer) {
          this._oldValue = this.obj.changer;

            //disable this line to see the counter not moving
           this._changeRef.detectChanges();
       }
    }
}
要注意的是, doCheck 是很昂貴的
為了要偵測這些 Angular 本身無法偵測到的事件
它必須以一個相對麻煩的方式做到
doCheck 有兩種呼叫時機
- 在 每一次 onChanges 之後
- 在 onInit 之後
也因此,doCheck 非常的耗資源
非常不建議在專案中大量使用,不然你的 user 會氣死
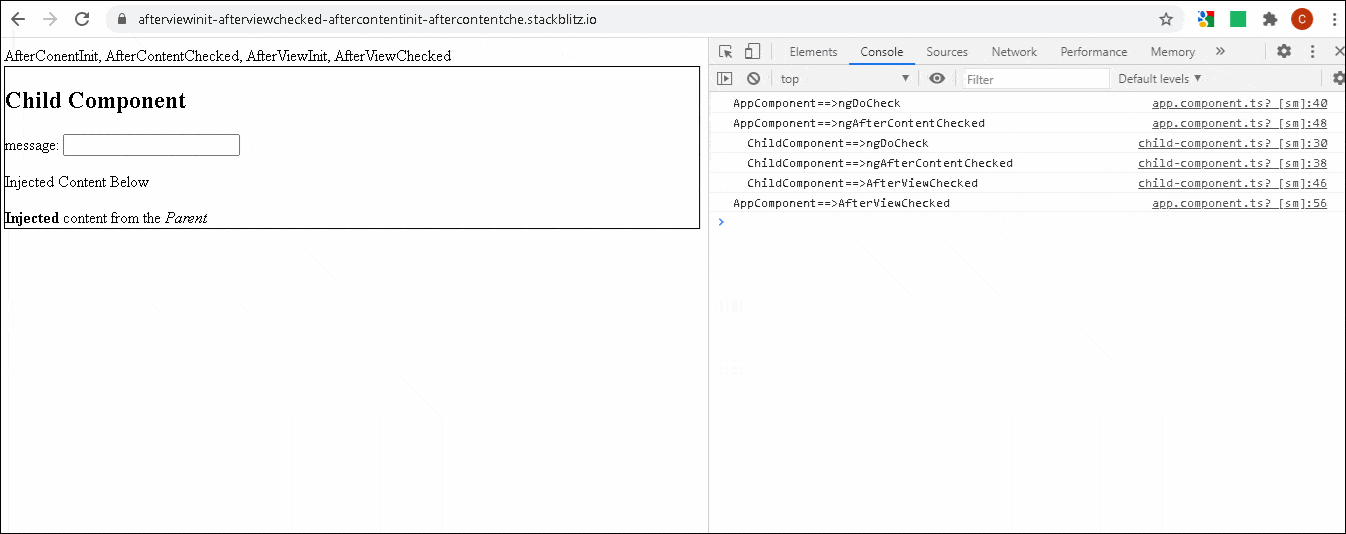
AfterContentInit, AfterContentChecked, AfterViewInit, AfterViewChecked
參考 Content vs. View 以及 Init vs. Checked Hooks
其執行時間基本上就是以上的排列組合
以個人的經驗來說,是很少會需要使用到
注意到由於 checked hook 昂貴的代價,使用時需要小心
OnDestroy
在 Angular 完全刪除 component 或 directives 之前呼叫,僅一次
類似 destructor, 你可以在這裡中止 subject 之類的
舉例來說
@Component({
    selector: 'app-component',
    templateUrl: './app-component.html',
    styleUrls: './app-component.scss'
})
export class AppComponent implements OnDestroy {
    historyReady$: BehaviorSubject<boolean> = new BehaviorSubject<boolean>(false);

    ngOnDestroy(): void {
        this.historyReady$.complete();
    }
}
Content vs. View
Content
Angular 提供了 content projection 的機制,讓你可以從 parent 送一些 content 到 child
這個 content 不限於 html, content, text 也都可以
亦即 content 是還未被處理過得資料
所以 hook 的部份才有分兩種
View
view 則相對清楚,也就是最終呈現出來的畫面
你的 code 可能這樣寫
<div>
  <h1>{{ user.name }}</h1>
  <p>Email: {{ user.email }}</p>
  <p>Bio: {{ user.bio }}</p>
</div>
最終的 view 則是長這樣
<div>
  <h1>John Smith</h1>
  <p>Email: john.smith@example.com</p>
  <p>Bio: I'm a software developer from San Francisco.</p>
</div>
根據 Angular Glossary - View 的定義
view 是由 component class 加上 html template 組成的
view 可以被動態的調整,比如說 user 點了按鈕會出現其他畫面這樣
Init vs. Checked Hooks
ref: AfterViewInit, AfterViewChecked, AfterContentInit & AfterContentChecked In Angular
Init Hooks
init hooks 只會在第一次初始化的時候被呼叫
Checked Hooks
當目標 DOM 有任何 change 發生,checked hook 都會執行
亦即,checked hook 的 overhead 會很大,即使是單純的 click 事件都會 trigger
Leave a comment