Kubernetes 從零開始 - Sidecar 與 Lifecycle Hook 組合技
Multiple Container in Pod
誠如我們之前在 Kubernetes 從零開始 - 容器基本抽象 Pod | Shawn Hsu 裡面提到的
Pod 本身其實可以執行多個 Container,只是說平常大家習慣是一個 Pod 一個 Container 而已
不過也是有 use case 是會需要使用到多個 Container 的
比方說你可能會需要一個額外的 Container 負責執行背景程序,輔助功能取向的任務
Logging 或者是監控等任務就非常適合使用多個 Container 的架構
也有可能是因為 legacy 的關係,導致多個 Container 必須共用同一個 Pod 的資源
Multiple Container Pattern
而多 Container 的架構在 Kubernetes 來說有幾個常見的 pattern
| Type | Ambassador | Adapter | Sidecar |
|---|---|---|---|
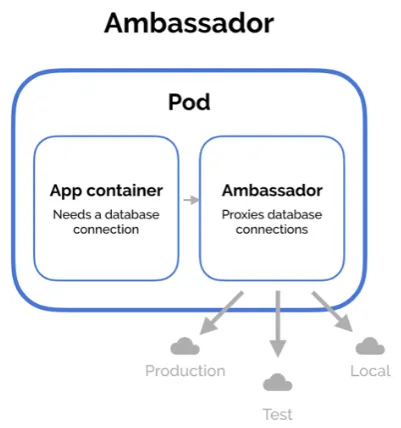
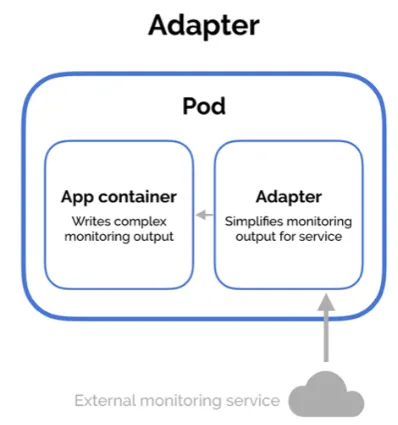
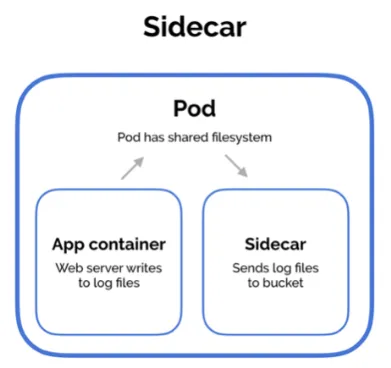
| Description | 透過 Ambassador Container 負責轉發對外請求,封裝內部邏輯 | 將 Container 的輸出進行轉換,類似攔截器的設計 | 擴充現有 Container 的功能 |
| Example |
 ref: Multi-Container Pod Design Patterns |
 ref: Multi-Container Pod Design Patterns |
 ref: Multi-Container Pod Design Patterns |
其實你會發現說,每一種 Container Pattern 都長得很像
注意到,他們只是實作的方式很像,但最終要達成的目的是不同的
Introduction to Sidecar Container
Sidecar Container 是與 main application container 一起執行的 輔助容器
他們多半使用提供輔助功能如 Logging, Monitoring 等等的任務
其實不論是 Ambassador 還是 Adapter, 他們皆使用多個 Container 的架構
你可以說,Sidecar 是最常見的一種,因為 Ambassador 與 Adapter 某種程度上來說也是 擴充了原本 Container 的功能
也因此現在 Sidecar Container 有點變成是個統稱了
他要怎麼達到擴充的功能?
別忘了,在同一個 Pod 底下,所有的 Container 共享所有的資源,包含 Network, CPU/Memory 以及 Volume 等等
因此,Sidecar Container 可以透過存取其共享資源以達到擴充的目的
舉例來說,如果要擴充 Logging 的功能,你可以設定 Logger 除了顯示在 console 上,也可以額外 Fan-out 到檔案裡頭,然後透過 Sidecar Container 負責後續的處理
或是以攔截封包來說,可以額外掛一個 tcpdump 截取所有執行過程中的封包
Different Ways to Implement Sidecar
The Old Way
在 Kubernetes 1.28 之前,你能夠定義多個 container 在 spec.containers 底下
不過這樣的問題在於,假設你需要控制啟動順序,你是沒辦法透過內建的機制來達成的
這種做法只適合他們必須要一起 co-work 的場景
1
2
3
4
5
6
7
8
9
10
11
12
13
14
15
16
17
18
19
20

spec:
  containers:
  - name: nginx
      image: nginx
      ports:
      - name: http
          containerPort: 80
      volumeMounts:
      - name: web
          mountPath: '/usr/share/nginx/html'
  - name: refresh
      image: alpine/git
      command:
      - sh
      - -c
      - watch -n 60 git pull
      workingDir: /usr/share/nginx/html
      volumeMounts:
      - name: web
          mountPath: '/usr/share/nginx/html'
The New Way
新版本的 Sidecar Container 則是屬於 initContainer 的 special case
與其讓他執行完就退出,Sidecar Container 引入了 container-level 的 restartPolicy 的欄位
將其設定為 Always 就可以讓他一直存活下去
其餘寫法則與一般的 initContainer 一樣
1
2
3
4
5
6
7
8
9
10
11
12
13
14
15
16
17
18
19

spec:
  containers:
  - name: myapp
      image: alpine:latest
      command: ['sh', '-c', 'while true; do echo "logging" >> /opt/logs.txt; sleep 1; done']
      volumeMounts:
      - name: data
          mountPath: /opt
  initContainers:
  - name: logshipper
      image: alpine:latest
      restartPolicy: Always
      command: ['sh', '-c', 'tail -F /opt/logs.txt']
      volumeMounts:
      - name: data
          mountPath: /opt
  volumes:
  - name: data
      emptyDir: {}
Sidecar Container Feature Gate
不過注意到,Kubernetes 1.28 仍需要手動開啟相對應的 feature gate 才能使用
Kubernetes 1.28 adds a new restartPolicy field to init containers that is available when the SidecarContainers feature gate is enabled.
你可以透過以下指令檢查是否已經開啟
1
2
3
4
5
6
7
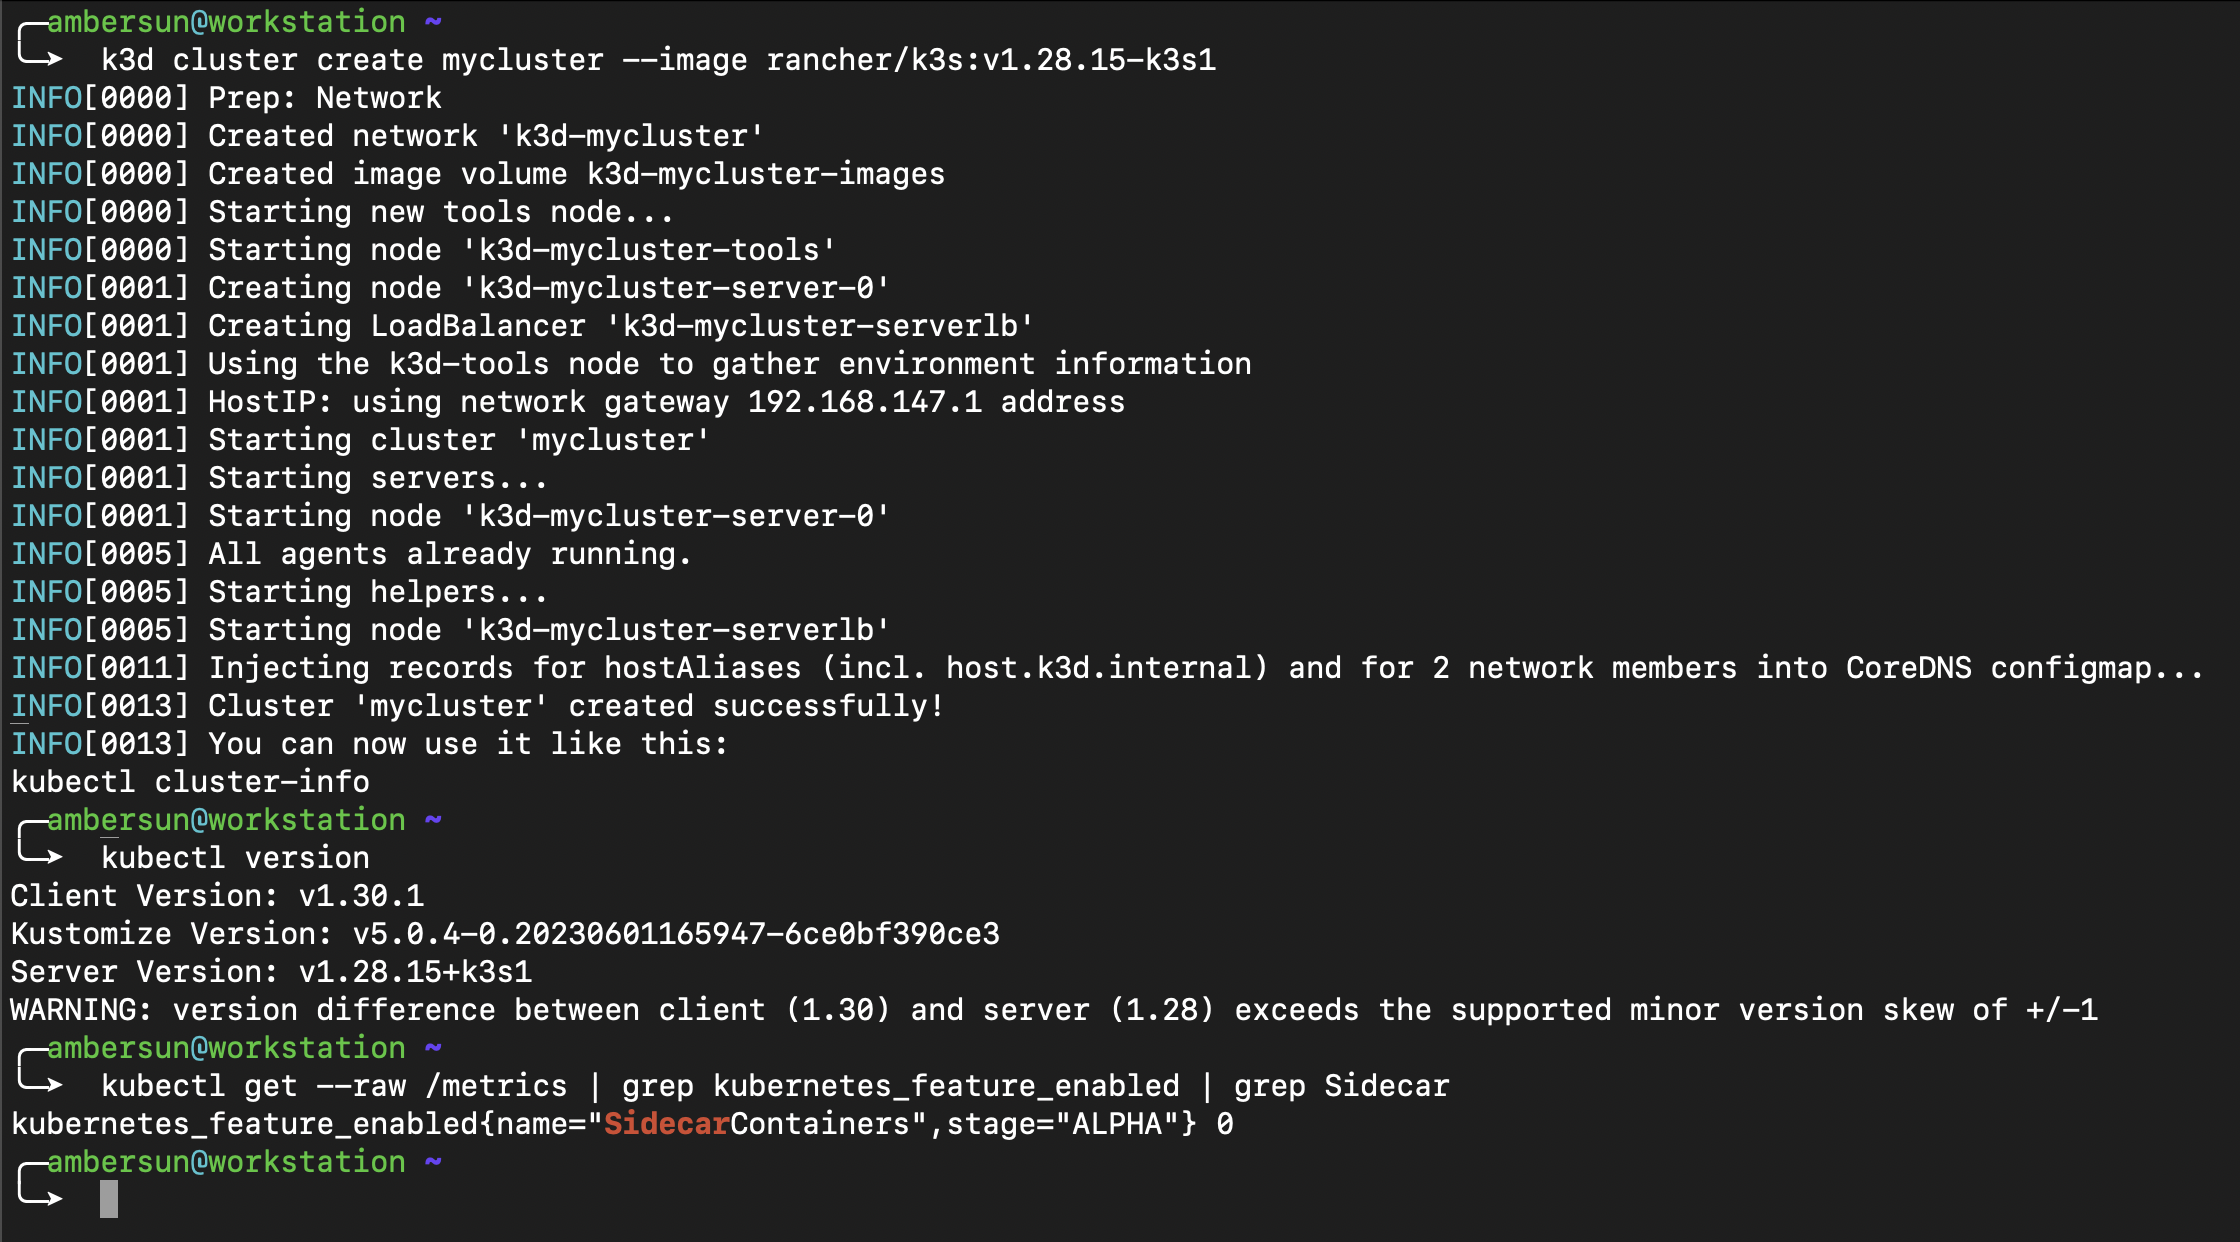
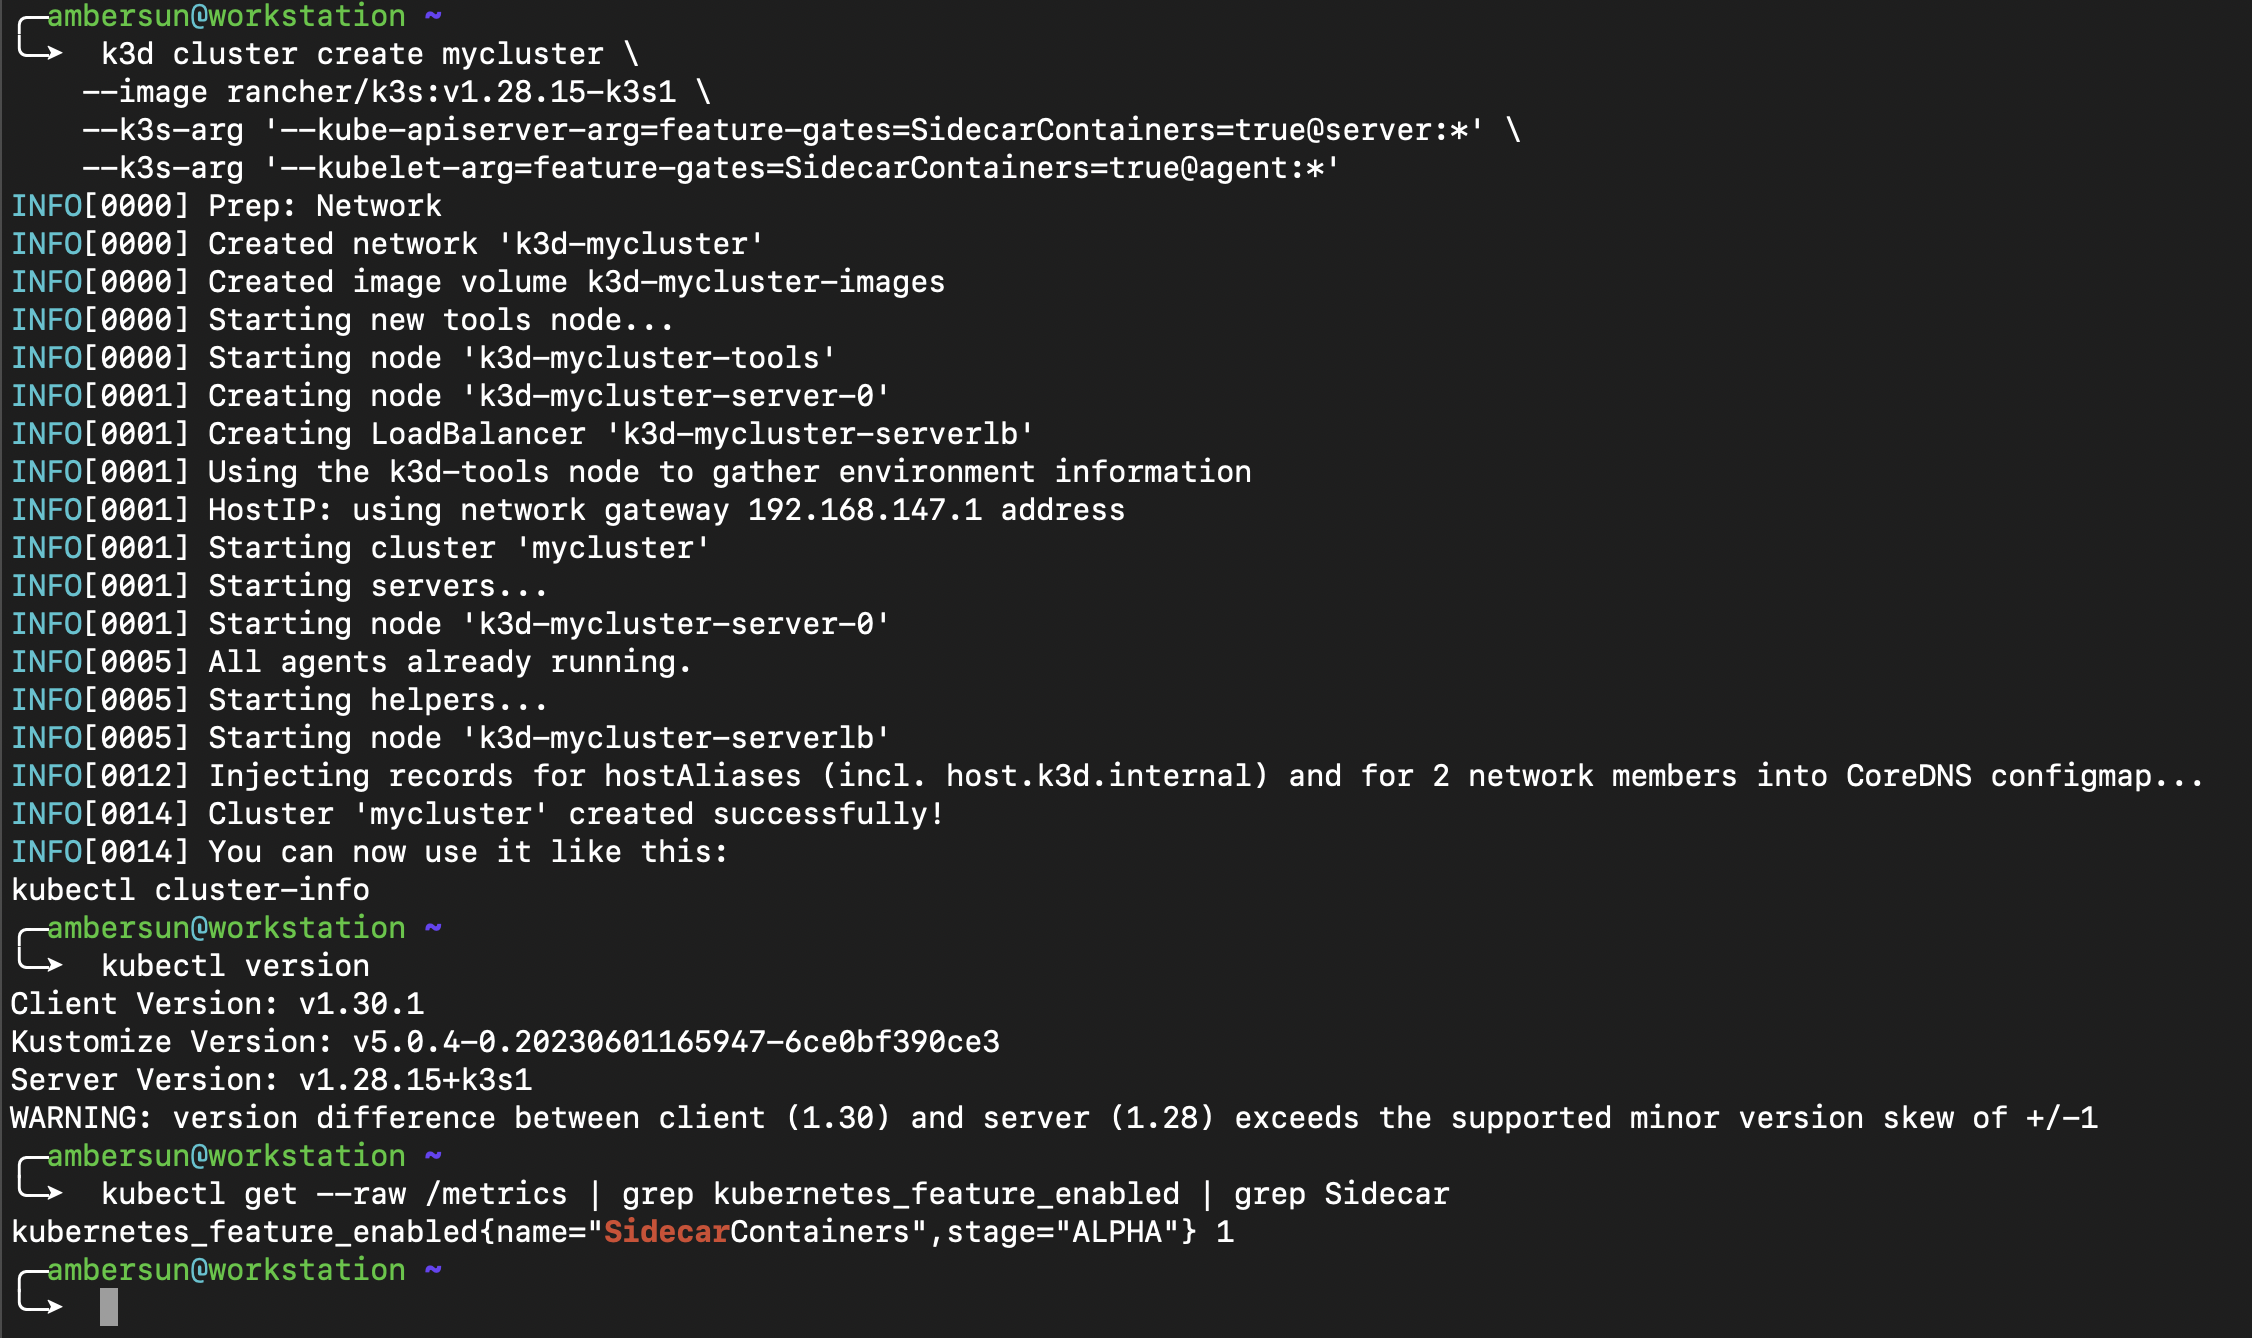
$ kubectl get --raw /metrics | grep kubernetes_feature_enabled | grep Sidecar
kubernetes_feature_enabled{name="SidecarContainers",stage="ALPHA"} 0
$ kubectl version
Client Version: v1.30.1
Kustomize Version: v5.0.4-0.20230601165947-6ce0bf390ce3
Server Version: v1.28.15+k3s1
可以看到說這台機器是 1.28 的版本,並且 feature gate 是關閉的(0: off, 1: on)
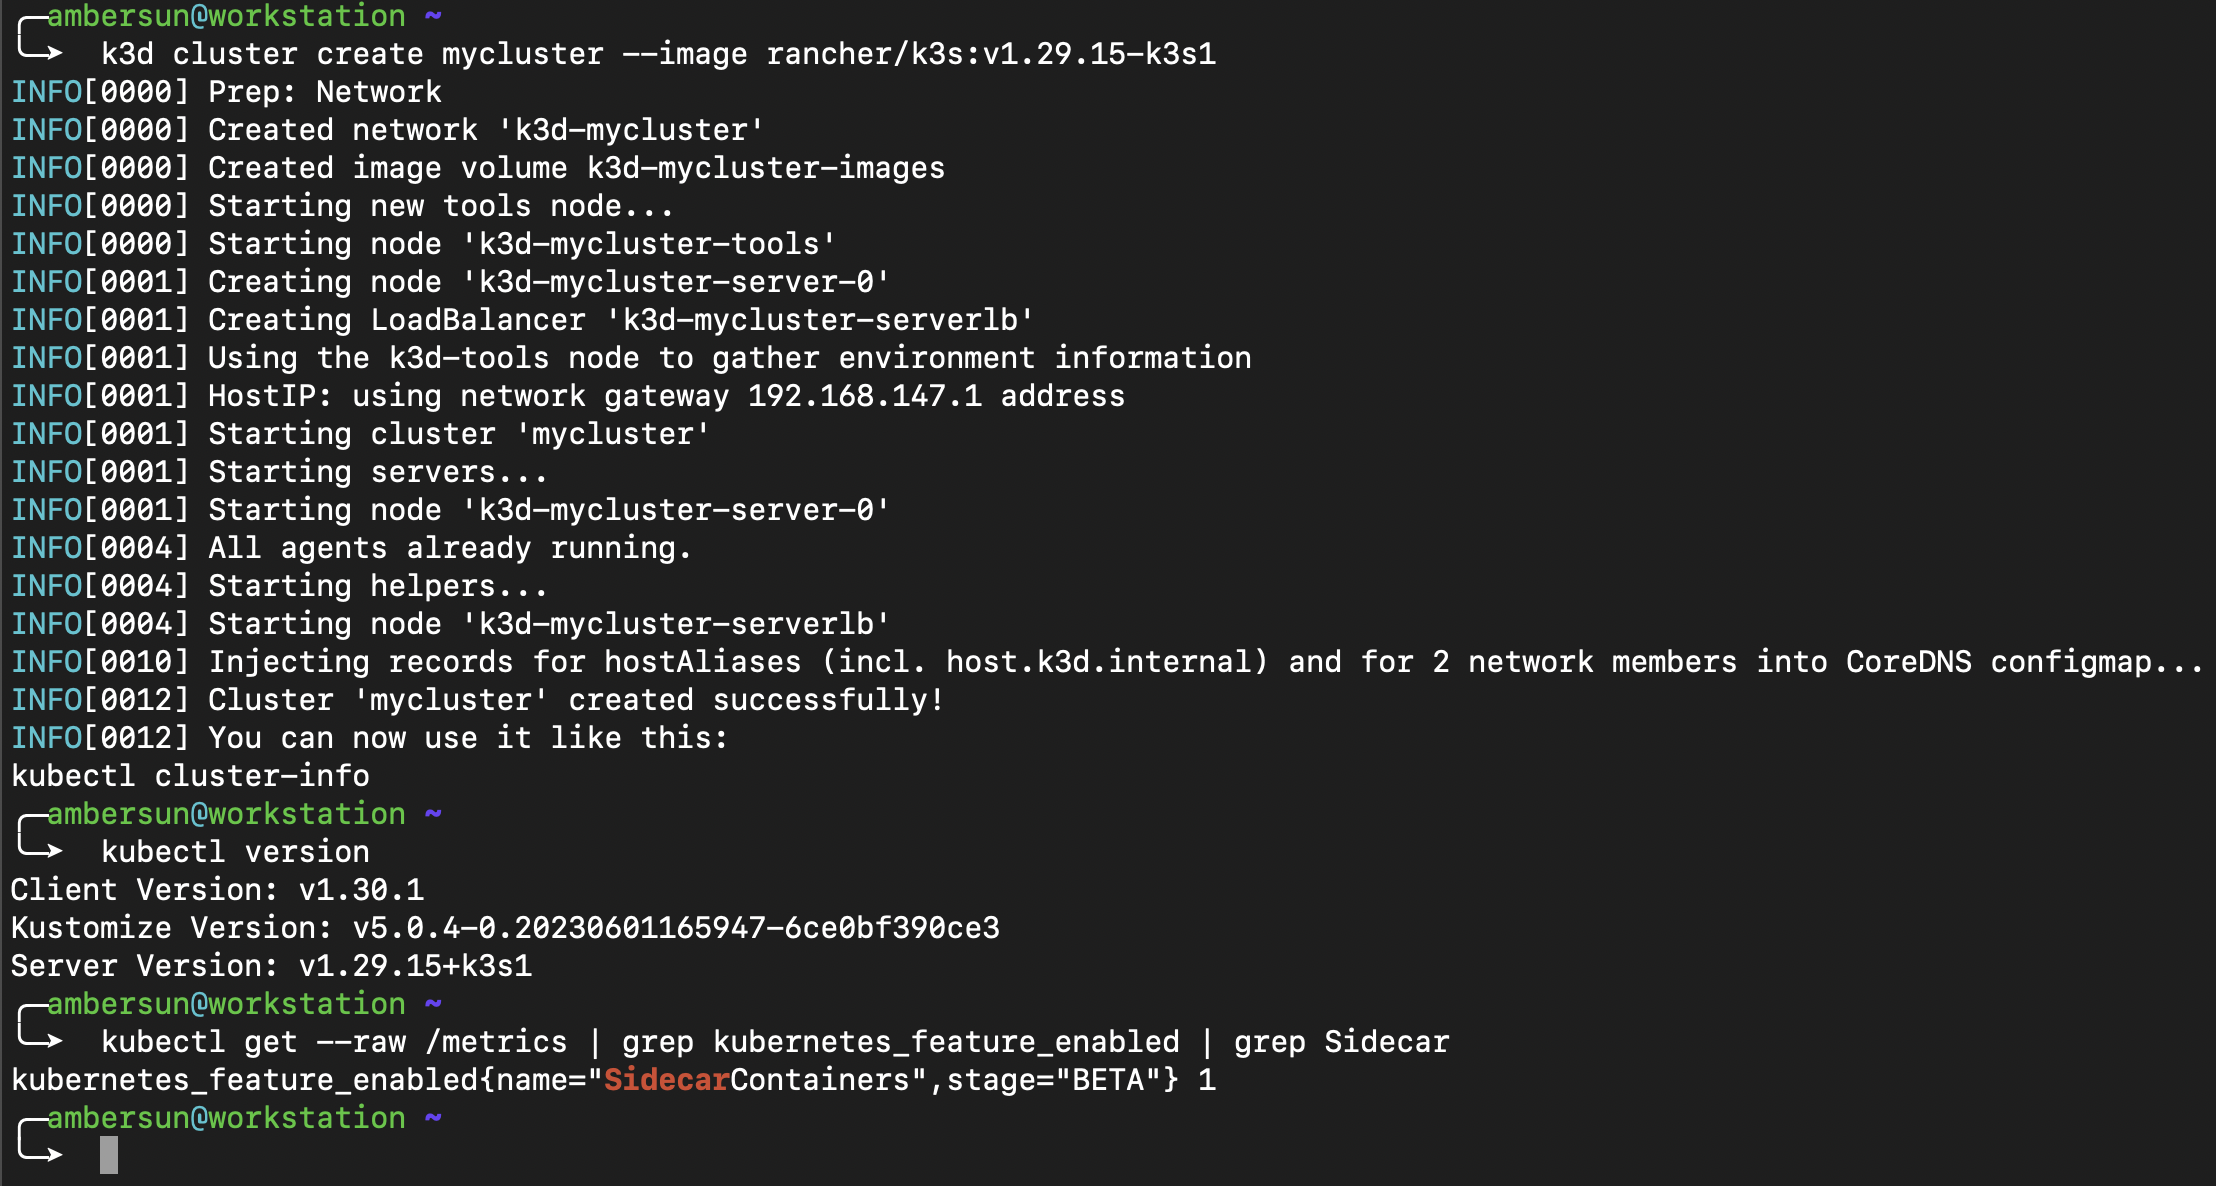
至於說 1.29 版本,則是預設開啟的
1
2

$ kubectl get --raw /metrics | grep kubernetes_feature_enabled | grep Sidecar
kubernetes_feature_enabled{name="SidecarContainers",stage="BETA"} 1
如果你是使用 k3d 來建立 cluster 的話,可以透過以下指令來手動開啟 feature gate
1
2
3
4

$ k3d cluster create mycluster \
    --image rancher/k3s:v1.28.15-k3s1 \
    --k3s-arg '--kube-apiserver-arg=feature-gates=SidecarContainers=true@server:*' \
    --k3s-arg '--kubelet-arg=feature-gates=SidecarContainers=true@agent:*'
如果是 K3s 只要開
--kube-apiserver-arg即可
Sidecar Container Lifecycle
既然是作為輔助容器,很多時候你會要求
- 在主容器啟動之前就先啟動
- 在主容器退出之後才退出
比方說你要監聽所有出入封包,你肯定是不想要漏掉最前面以及最後面那幾個封包的
這時候啟動順序就很重要了
注意到 Sidecar Container 的生命週期是與 main application container 脫鉤的
Sidecar Container 擁有自己獨立的生命週期,他是可以被單獨啟動,終止甚至重啟的
他沒辦法影響到其他 initContainer 的狀態,也沒辦法影響到 main application container 的狀態
但是可以被反過來影響(可參考 Pod Termination)
Pod Initialization
針對啟動的部分,因為 Sidecar Container 作為 initContainer 的 special case
他本質上也是繼承了 initContainer 的特性,也就是說
- 他一定會按照
spec.initContainers的正順序來啟動 - 也表示他一定會在主容器之前啟動(因為只有 initContainer 都執行完畢,主容器才會啟動)
你甚至可以將 一般 Init Container 與 Sidecar Container 混合在一起
Pod Termination
當 main application container 要被終止的時候,Kubelet 會先處理 main application container 的終止流程
直到它完成之後,才會開始處理 Sidecar Container 的終止流程
terminate 的流程剛好是 反過來的,會是 spec.initContainers 的逆順序(也就是先進後出)
一個一個的停止,直到所有的 Sidecar Container 都終止為止
Sidecar Container 的 terminate 流程並不一定能完整執行
Container 終止是有一個 deadline 的(稱為terminationGracePeriodSeconds)
如果超過這個時間,Kubernetes 會強制終止 Container
Sidecar Container Probes
Sidecar Container 是支援 Probe 的
因為他是個 long live 的 container 嘛,所以該有的 Liveness, Readiness 都有
有關 Probe 的討論可以參考 Kubernetes 從零開始 - Self Healing 是如何運作的 | Shawn Hsu
Sidecar in Different Workloads
前面有提到說,Sidecar Container 的生命週期是與 main application container 脫鉤的
Sidecar Container 不能影響到其他人,但別人可以影響到他
以 Job 來說,只要 main application container 終止了,Sidecar Container 也會跟著終止
但如果是 Deployment,因為他會有重啟的機制,所以 Sidecar Container 也會跟著重啟
你的 Sidecar Container 就會執行無數次
Container Lifecycle Hook
Lifecycle Hook 就是可以允許你額外在特定階段執行一些額外的邏輯
目前 Kubernetes 提供了兩種 Hook 的機制
| Type | Description | Time |
|---|---|---|
postStart |
在 Container 啟動之後執行 | 與 Container 的啟動流程同步,但不保證誰先執行完 |
preStop |
在 Container 被終止之前執行 |
preStop Hook 會在 Container 終止之前執行,但不一定可以執行完 |
還有額外的一種
stopSignal可以 overwrite 掉 container 的預設終止訊號
ref: Define custom stop signals
你能夠設定以下不同的 Hook Handler 在上述時間點上執行
| Type | Description | Executor |
|---|---|---|
Exec |
執行一個命令 | Container |
HTTP |
對一個 HTTP 端點發送請求 | Kubelet |
Sleep |
暫停一段時間 | Kubelet |
Lifecycle Hook Delivery
以上兩種 lifecycle hook 的機制,保證會至少執行一次(i.e. at least once)
在某些極端情況下,hook 會被執行超過一次
也因此,在設計 hook 的時候,你需要將其設計為 idempotent 的
Example
1
2
3
4
5
6
7
8
9
10
11
12

volumeMounts:
  - name: data
    mountPath: /opt
lifecycle:
  preStop:
    exec:
    command:
      [
        "sh",
        "-c",
        'printf "$(date +"%T.%N") stopping prestop\n" >> /opt/logs.txt',
      ]
Lifecycle Hook Log
你可能會發現說,preStop 的 printf 並不會顯示在 kubectl logs 上
Kubernetes 並不會將 Hook Handler Log 接上 Pod Event
所以無論如何你都看不到執行的 Log
取而代之的是會 broadcast 相對應的 Pod Event,如果失敗
-
preStop會 broadcastFailedPreStopHookevent -
postStart會 broadcastFailedPostStartHookevent
怎麼觸發呢? 把指令改成壞的就可以了
Tcpdump Sidecar Container Example
Environment
1
2
3

$ k3d --version
k3d version v5.7.1
k3s version v1.29.6-k3s1 (default)
Example
1
2
3
4
5
6
7
8
9
10
11
12
13
14
15
16
17
18
19
20
21
22
23
24
25
26
27
28
29
30
31
32
33
34
35
36
37
38
39
40
41
42

apiVersion: batch/v1
kind: Job
metadata:
  name: myjob
spec:
  template:
    spec:
      containers:
        - name: main-container
          image: curlimages/curl
          command: ["sh", "-c", "curl google.com"]
          volumeMounts:
            - name: data
              mountPath: /opt
      initContainers:
        - name: upload-logs
          image: nicolaka/netshoot
          restartPolicy: Always
          command: ["sh", "-c", "sleep 86400"]
          volumeMounts:
            - name: data
              mountPath: /opt
          lifecycle:
            preStop:
              exec:
                command:
                  [
                    "sh",
                    "-c",
                    "curl -X POST https://webhook.site/bee40c4c-07a5-42bb-b2af-c24e3f4ea693 --data-binary @/opt/tcpdump.pcap",
                  ]
        - name: tcpdump
          image: nicolaka/netshoot
          restartPolicy: Always
          command: ["sh", "-c", "tcpdump -i any -w /opt/tcpdump.pcap"]
          volumeMounts:
            - name: data
              mountPath: /opt
      restartPolicy: Never
      volumes:
        - name: data
          emptyDir: {}
Webhook 的測試站點可以參考 Webhook.site
以上是一個簡易的 Sidecar Container 的範例
這裡我初始化了兩個 Sidecar, 一個是負責 tcpdump 的封包擷取,一個是負責將封包傳送到 Webhook 上
而主容器則是負責發出請求
注意到 upload-logs 是排第一個
前面提到 Sidecar Container 啟動以及終止的順序 是跟 spec.initContainers 的順序有關
這裡 upload-logs 是排第一個是因為我想要讓他在 terminate 的時候是 最後執行的
The Reason “Killing”
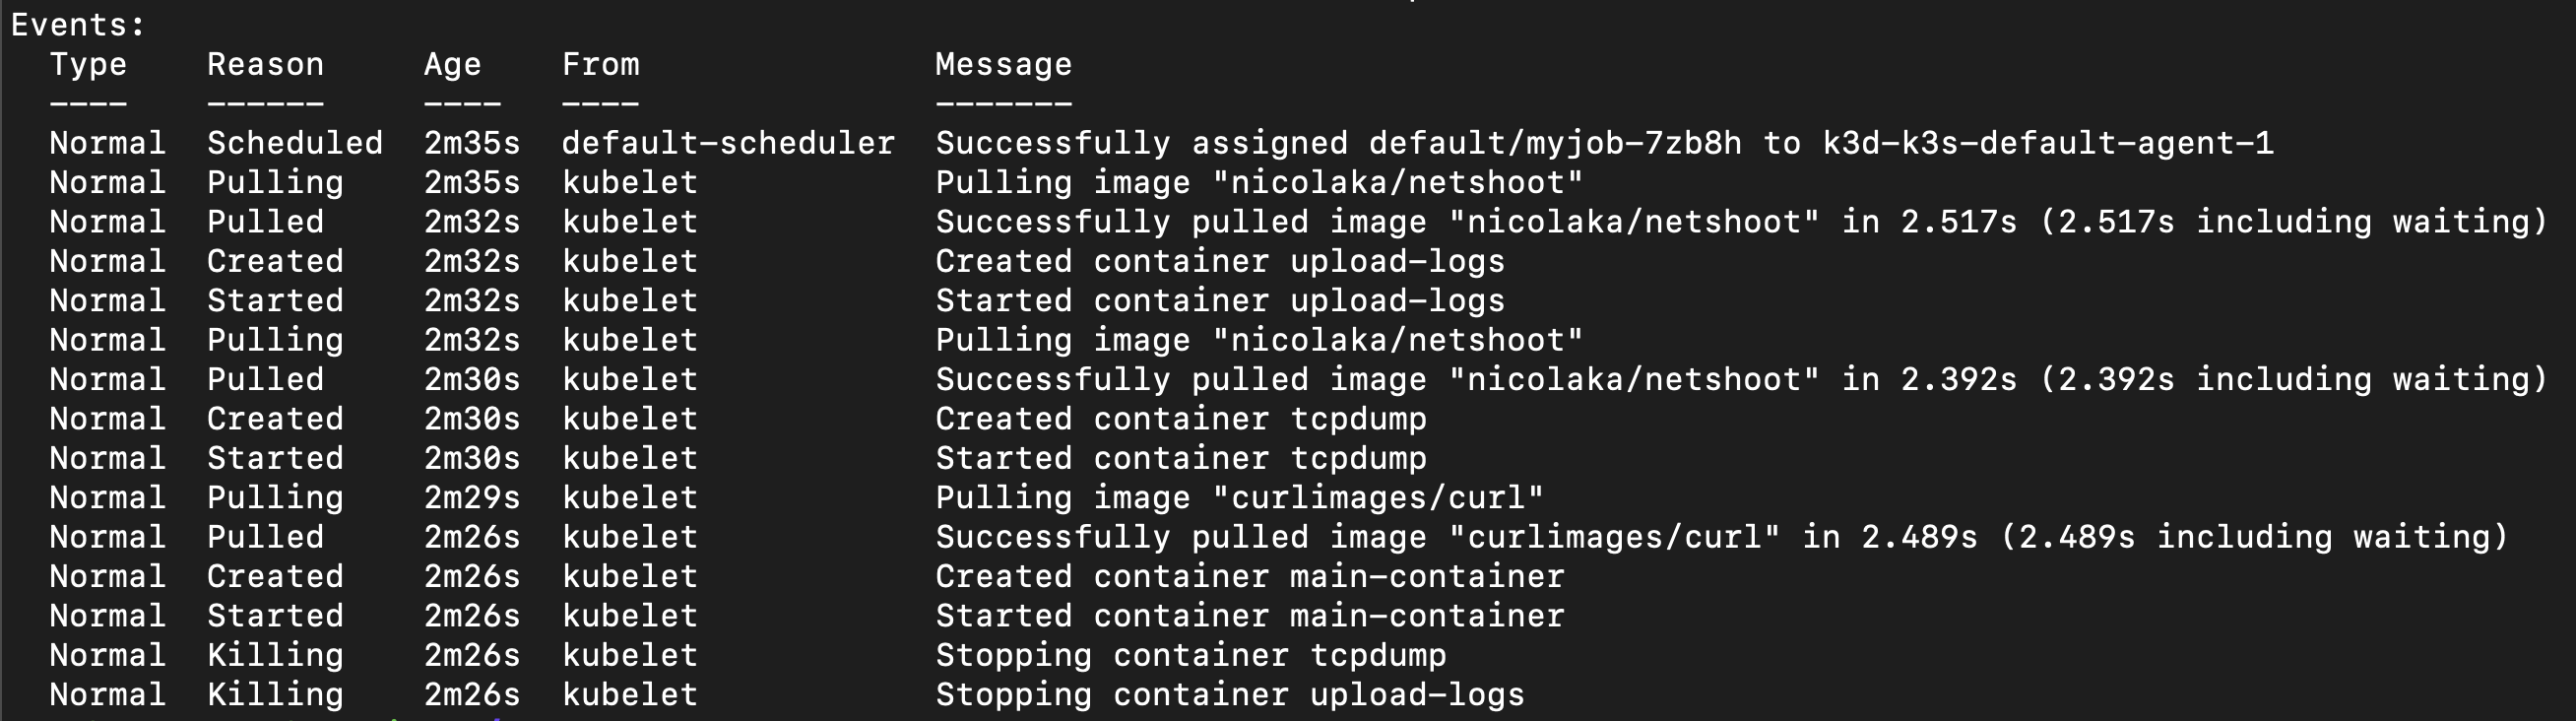
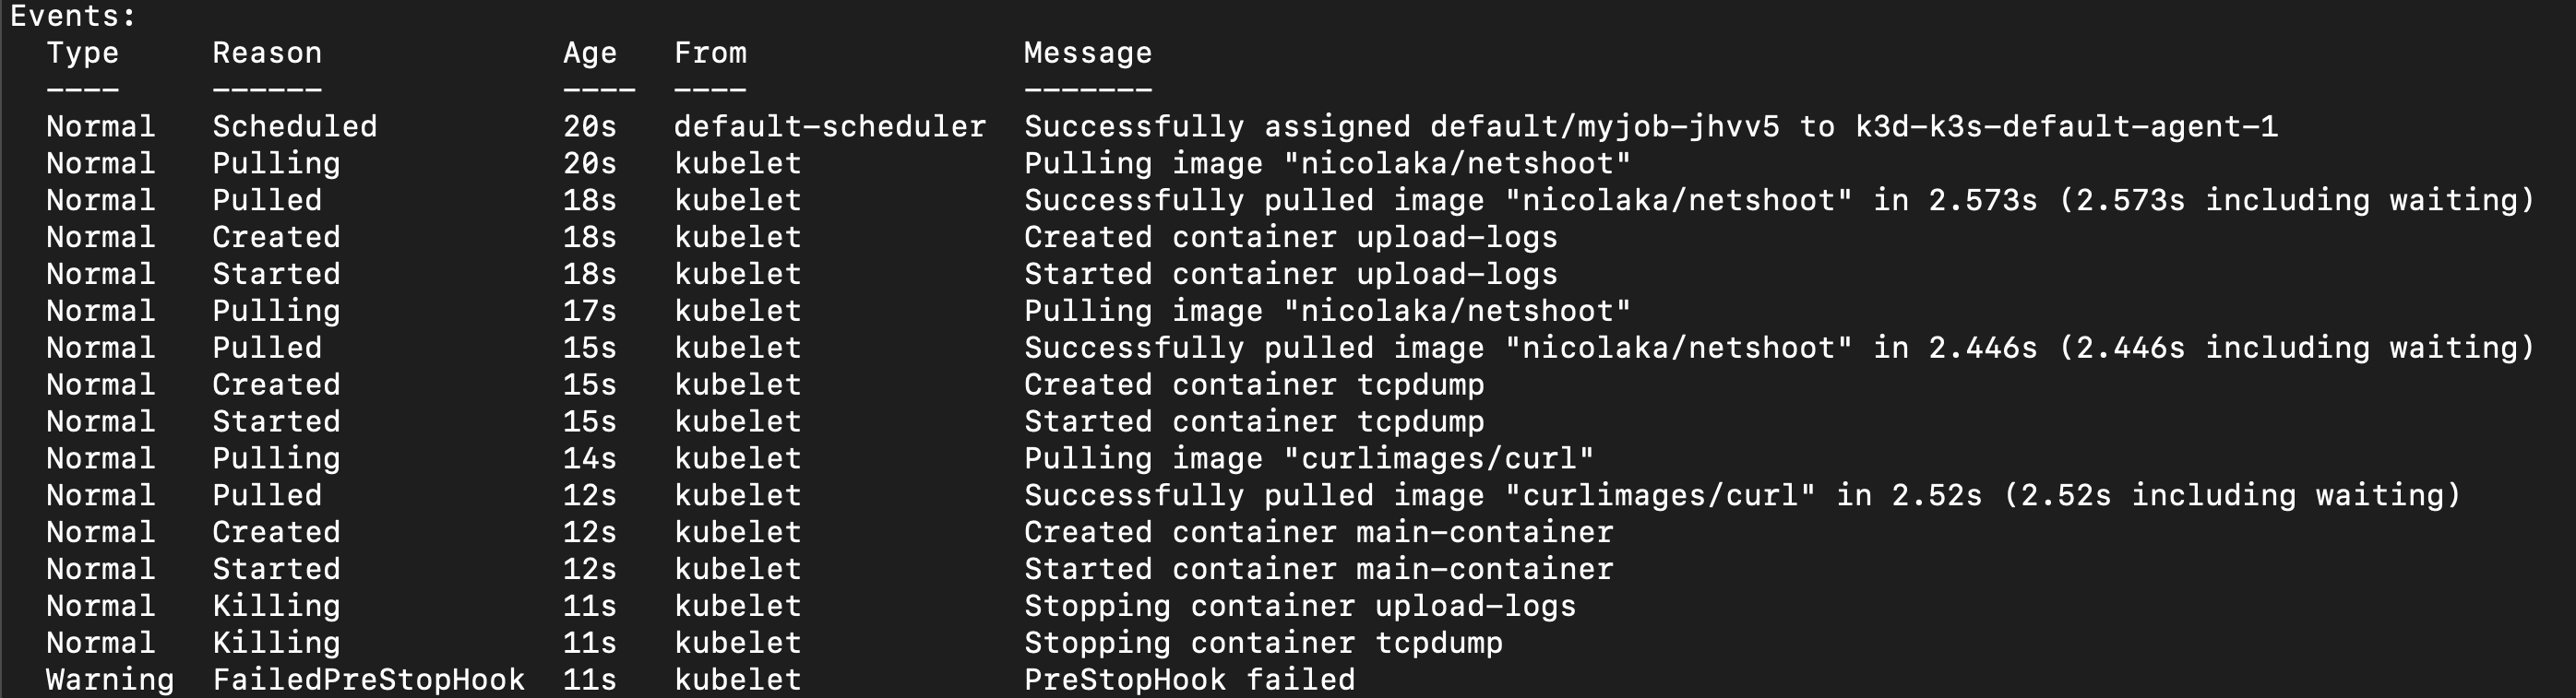
在 describe pod 的時候
奇怪? 為什麼 upload-logs 以及 tcpdump 都有一個 Killing Event 呢?
答案其實也挺簡單的,因為 Sidecar Container 也是會被 Terminate 的(在 main container 之後)
所以他只是單純的通知 Sidecar Container 要終止了
The SIGTERM and SIGKILL Signal
在 Lifecycle Hook Log 有提到說,你是看不到任何的 log 的
你頂多只能根據 Event 來判斷 Sidecar Container 的狀態
但也只是知道有沒有失敗而已,很明顯這樣是不足以滿足我們的需求的
我就好奇啦 到底我的兩個 Sidecar 的狀態如何
$ kubectl get pod myjob-xxx -o yaml > log.yaml 指令可以更詳細的看到 Pod 的狀態
1
2
3
4
5
6
7
8
9
10
11
12
13
14
15
16
17
18
19
20
21
22
23
24
25
26
27
28
29
30
31
32
33
34
35
36
37
38
39
40
41
42
43
44
45
46
47
48
49
50
51
52
53
54
55
56

containerStatuses:
  - containerID: containerd://83d436fad827bb0568994380dcc771abdfcf406366148560a6484e787a2ad2ea
    image: docker.io/curlimages/curl:latest
    imageID: docker.io/curlimages/curl@sha256:d43bdb28bae0be0998f3be83199bfb2b81e0a30b034b6d7586ce7e05de34c3fd
    lastState: {}
    name: main-container
    ready: false
    restartCount: 0
    started: false
    state:
      terminated:
        containerID: containerd://83d436fad827bb0568994380dcc771abdfcf406366148560a6484e787a2ad2ea
        exitCode: 0
        finishedAt: "2025-05-17T19:40:44Z"
        reason: Completed
        startedAt: "2025-05-17T19:40:44Z"
  hostIP: 192.168.97.3
  hostIPs:
  - ip: 192.168.97.3
  initContainerStatuses:
  - containerID: containerd://7d9c1ee00a12e5e078f34a5acdb4c823f8640a66285833344436b13a10ba16b7
    image: docker.io/nicolaka/netshoot:latest
    imageID: docker.io/nicolaka/netshoot@sha256:a20c2531bf35436ed3766cd6cfe89d352b050ccc4d7005ce6400adf97503da1b
    lastState: {}
    name: upload-logs
    ready: false
    restartCount: 0
    started: false
    state:
      terminated:
        containerID: containerd://7d9c1ee00a12e5e078f34a5acdb4c823f8640a66285833344436b13a10ba16b7
        exitCode: 137
        finishedAt: "2025-05-17T19:41:14Z"
        reason: Error
        startedAt: "2025-05-17T19:40:37Z"
  - containerID: containerd://614b4873d23538f37d9f45cb26b084361d5da5a27bc943a149272ac876d58236
    image: docker.io/nicolaka/netshoot:latest
    imageID: docker.io/nicolaka/netshoot@sha256:a20c2531bf35436ed3766cd6cfe89d352b050ccc4d7005ce6400adf97503da1b
    lastState: {}
    name: tcpdump
    ready: false
    restartCount: 0
    started: false
    state:
      terminated:
        containerID: containerd://614b4873d23538f37d9f45cb26b084361d5da5a27bc943a149272ac876d58236
        exitCode: 0
        finishedAt: "2025-05-17T19:40:44Z"
        reason: Completed
        startedAt: "2025-05-17T19:40:40Z"
  phase: Succeeded
  podIP: 10.42.1.64
  podIPs:
  - ip: 10.42.1.64
  qosClass: BestEffort
  startTime: "2025-05-17T19:40:34Z"
你要關心的是裡面的 state
可以看到說
-
main-container: exitCode 0, 正常結束 -
upload-logs: exitCode 137, 被強制終止 -
tcpdump: exitCode 0, 正常結束
恩? 恩???
為什麼 upload-logs 會被強制終止呢?
Pod Lifecycle
我想要延伸一下 Pod Termination 的內容
概念上還是一樣的,main container 結束之前,Sidecar Container 會繼續執行
main container 結束之後才會開始處理 Sidecar Container
Kubernetes 要終止 Container 是發送 SIGTERM 的訊號(這也解釋了為什麼你在 describe pod 的時候會看到 Killing Event)
而刪除這個動作並非是你可以慢慢做,他是有一個時間限制的(terminationGracePeriodSeconds, 預設 30 秒)
這個 terminationGracePeriodSeconds 是 所有 main container + 所有 Sidecar Container + 所有 lifecycle preStop 的終止時間總和,他們是共享的
也就是說如果 main container 花了比較久的時間執行,那剩餘的時間就不多了
如果真的執行不完怎麼辦? Kubernetes 會強制終止(SIGKILL)
對於 Kubernetes 來說,Sidecar Container 能不能 Graceful shutdown 並沒那麼重要
所以整體流程會是
-
SIGTERM通知 Container 要終止了 - 等待
terminationGracePeriodSeconds的時間 - 如果 Container 還沒結束,則強制終止(
SIGKILL)
The Exit Code
所以顯然,upload-logs 的 exit code 並不是巧合
而實際上也的確是因為他被強制終止了
注意到這裡的 exit code 是 Sidecar Container 本身的 exit code
並不是 lifecycle hook 的 exit code(他會用 Event 表示, 可參考 The Reason “Killing”)
-
SIGTERM的 exit code 是143=SIGNAL 15(128 + 15) -
SIGKILL的 exit code 是137=SIGNAL 9(128 + 9)
雖然根據 Differences from application containers 裡面它有提到說
So exit codes different from 0 (0 indicates successful exit), for sidecar containers are normal on Pod termination and should be generally ignored by the external tooling.
但 沒道理啊
為什麼單純的 sleep 會被強制終止?
理應他會先收到 SIGTERM 然後如果真的超過時間,才會 SIGKILL
原因在於,sleep 86400 在 Sidecar Container 裡面被覆寫為 pid 1
pid 1 的 init process 要負責處理 SIGTERM 的訊號(以及通知 child process 終止)
很明顯,單純的 sleep 並沒有處理這個訊號
也因此他最終是被 SIGKILL 強制終止的
我們可以利用 trap 來處理特定的訊號,以這個例子來說,就是 SIGTERM
然後將 sleep 指令放到 background process 並使用 wait 來攔截訊號
放到背景執行是因為,foreground process 會阻塞訊號直到完成
所以改起來會是
1

$ trap 'exit 0' TERM; sleep 86400 & wait
這樣子,所有的 Sidecar Container 都能夠正常的結束
以上,我們已經完全了解 Sidecar Container 的全部機制了
Comparison with Different Container Types
| Type | Application | Init | Sidecar |
|---|---|---|---|
| Definition location | spec.containers |
spec.initContainers |
spec.containers or spec.initContainers
|
| Lifecycle | Independent | Dependent | Independent |
| Probes | |||
| Share Resources | |||
| Communication | Bidirectional | Unidirectional | Bidirectional |
References
- Multi-Container Patterns in Kubernetes: Adapter, Ambassador, Sidecar
- Ambassador Container Pattern
- Sidecar Container Pattern
- Multi-Container Pod Design Patterns
- Differences between Sidecar and Ambassador and Adapter pattern
- Sidecar Containers
- Container Lifecycle Hooks
- Attach Handlers to Container Lifecycle Events
- Pod Lifecycle
- SIGTERM: Linux Graceful Termination | Exit Code 143, Signal 15
- “trap … INT TERM EXIT” really necessary?
- Cannot trap SIGINT and SIGTERM when using “sleep infinity” [duplicate]
- shell中trap的使用
- FAQ
Leave a comment